logo
Wrong email address or username
Incorrect verification code
back to top
Search tags: background-removal-service
Load new posts () and activity
Like Reblog Comment
text 2019-10-29 11:49
Clipping Path vs Photo Masking

Photoshop is versatile in that it offers different ways to achieve the same goal. One such goal in image editing is to select an object and remove its background. This can be a simple or complex operation depending on the object’s profile and the background which dictate whether masking or clipping path is the appropriate one. Take a look at the images that follow and you will understand better the differences and whether to choose clipping path or photo masking technique.

Purely clipping path
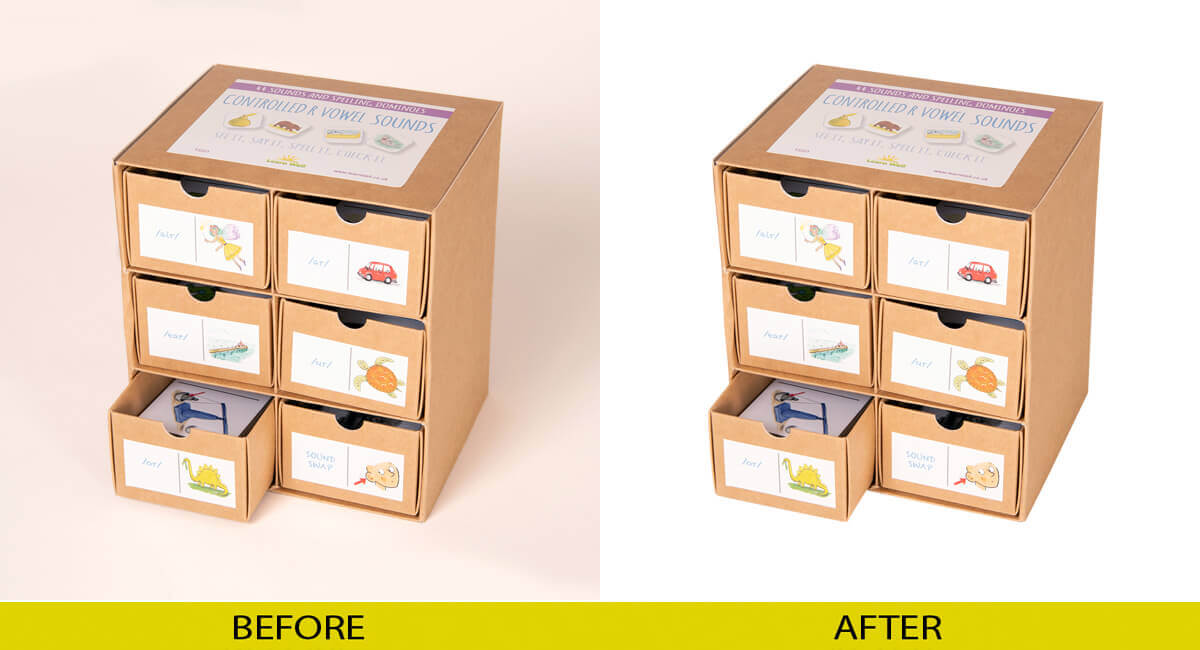


This is a simple image in that the object has geometric lines. The background too is more or less of an even tone. One can use masking such as the elementary magic wand and adjust tolerances as well as shift+click to select the background. The drawback is that some parts of the object may be selected in the photo masking method. The drawback is that the selection may not match the straight lines of the object. This is why professional clipping path services usually select the clipping path technique using the pen to draw an outline around the object, convert it to selection, invert it and then delete the background. One may just as well not invert the selection and copy paste it into another image, adding suitable drop shadows for a touch of realism.

There is no strict rule that you must use only masking or only clipping path. In fact, one may start by using the pen tool and then go on to create a layer mask and work further to achieve the desired goal. In this case, it is to cut out the background and ensure the object’s profile is as perfect as possible.

Clipping path vs Image Masking


The above is a complex image in that there are several objects with highly irregular profile further complicated by the presence of fine strands of hair. One can choose clipping path or image masking. In this instance, Photoshop masking could actually be a better option if one wishes to retain fine details of hair and other fine irregularities for a more realistic and natural feel. The clipping path example on the left shows how the background is removed. However, if you look closely, some details of the fur hat on the girl on the left and that of the seated girl with dark hair are lost. Still, if the cut-out image is not going to be printed at a larger size or will be set against another background, no one is going to look too closely. Purists and professionals in background removal service may opt for non-destructive editing by creating a layer copy of the background first and then apply finely tuned contoured masks with brush or other techniques to retain details of the hair as can be seen in the right image. Experts, of course, will add a bit of contrast with channels so that masking and selection can be more precise and use burn to paint over details while retaining fine hair.

When one uses channels, you have to check the R G and B channels to know which channel gives the best result for masking. One can use levels control or curves to adjust contrast and intensity so that there is good separation. Then one can use brushes and adjust their fineness as well as spread, keeping it hard or soft according to the subject being treated. All this comes from experience that clipping path services and their team develop over years. The outcome is perfect and looks natural which is something amateur dabblers in Photoshop are not able to achieve because they do not have the skills or know which tools, methods, steps and processes to use.

Clipping Path and Photo Masking
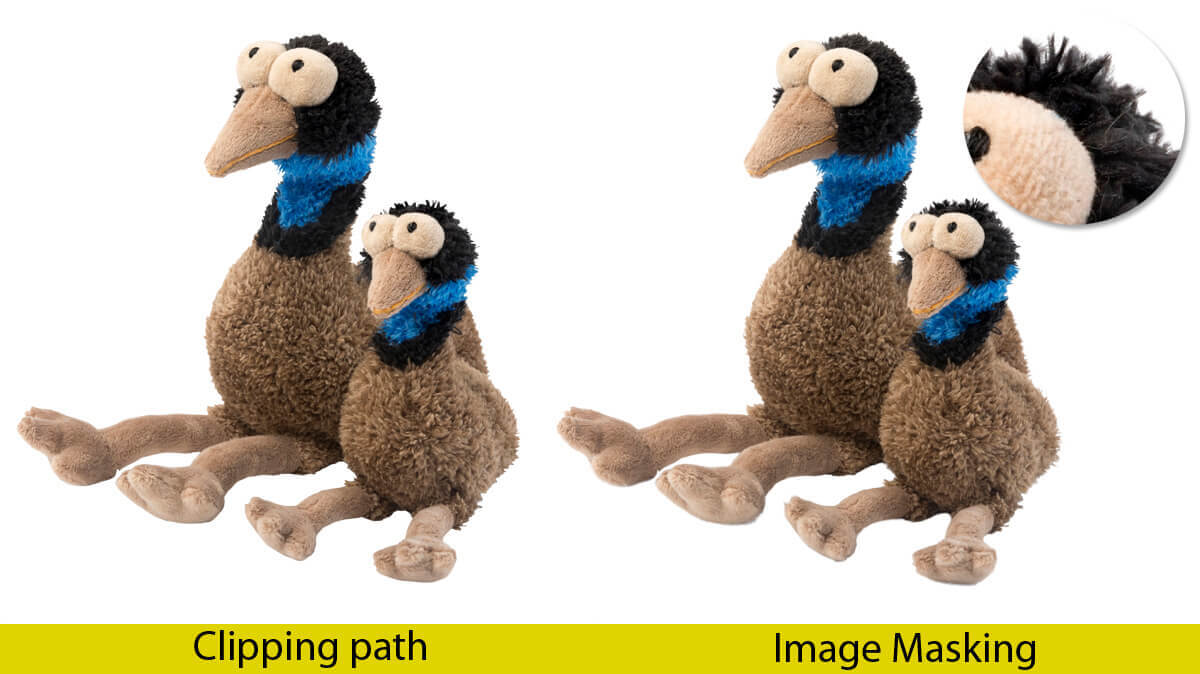


A look at the above image shows results achieved by using masking and by using clipping path techniques.

The differences are subtle and it depends on the clipping path service to choose one or the other depending on the background. Experts in background removal service may opt for the pen tool, adjust nodes to closely follow contours around the fur of the two toys and then go further to create another layer mask after which the background becomes transparent. Here too, there are options in choosing channels and adjusting masking with the help of brush tool to render areas transparent or opaque. If the background is one solid color, the task is easy. However, if it is jumbled or has color similar to the fur color then making a selection does pose a challenge but nothing that clipping path experts cannot overcome.

Clipping vs Masking – Masking may be better at times
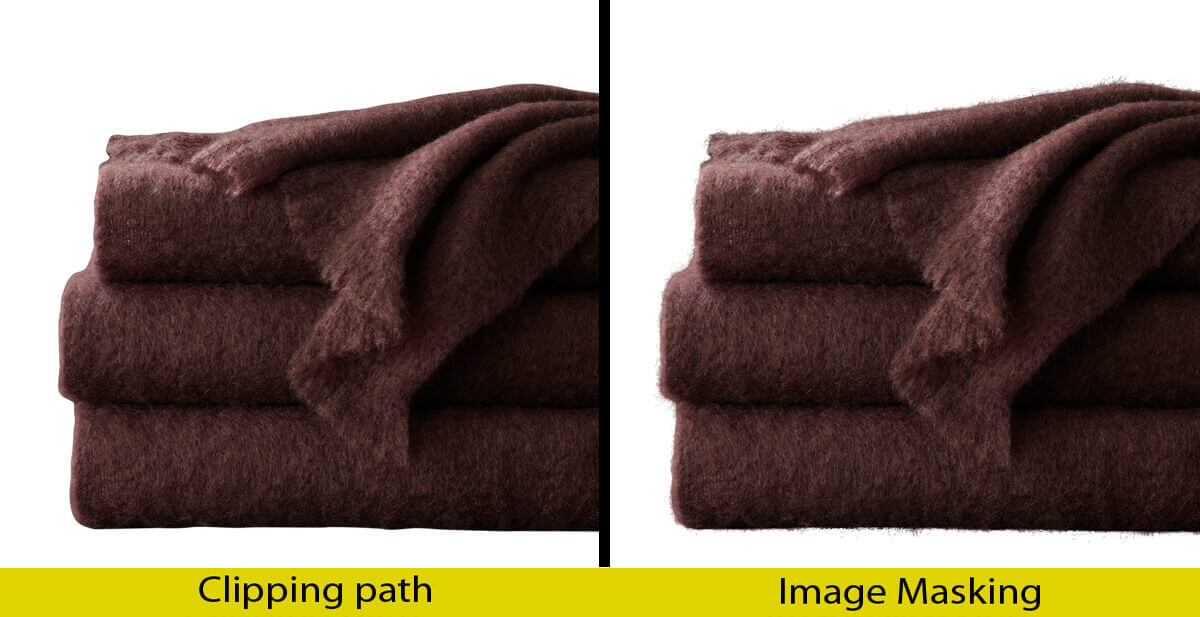


The editor is in charge of deciding whether to use clipping path or masking to remove the background. The above image shows a blanket processed with clipping path on the left and photo masking on the right. Which one is better is a moot point. Sometimes, such as when the image is to be used in a magazine or a catalog, one may not want the fine hairs of the blanket to show. In this case, the clipping path method is better because it creates a smooth, even outline for the blanket. This is acceptable. The presence of fine hair in the masking method may give the blanket a rather used or rough effect that may not do well in promotions. Professional Photoshop masking services know intuitively which method to use once they know the end purpose for which the image is going to be used. The profile is so much neater with a clipping path applied.

Even though the clipping path result is not quite natural, viewers are not expected to know that the blanket shows fine filaments of hair. Rather, they expect it to be a smooth fabric and the smooth look adds to the appeal of the image. Discretion is used here in the interest of projecting a superior look. Rules do not apply. Clipping path services may work with art directors of advertising agencies to create ads and must furnish the best possible finished image. In such cases, the art director may be shown the image with clipping path or the masking technique image and it is up to him to choose one that suits his visualization.

Photo Masking
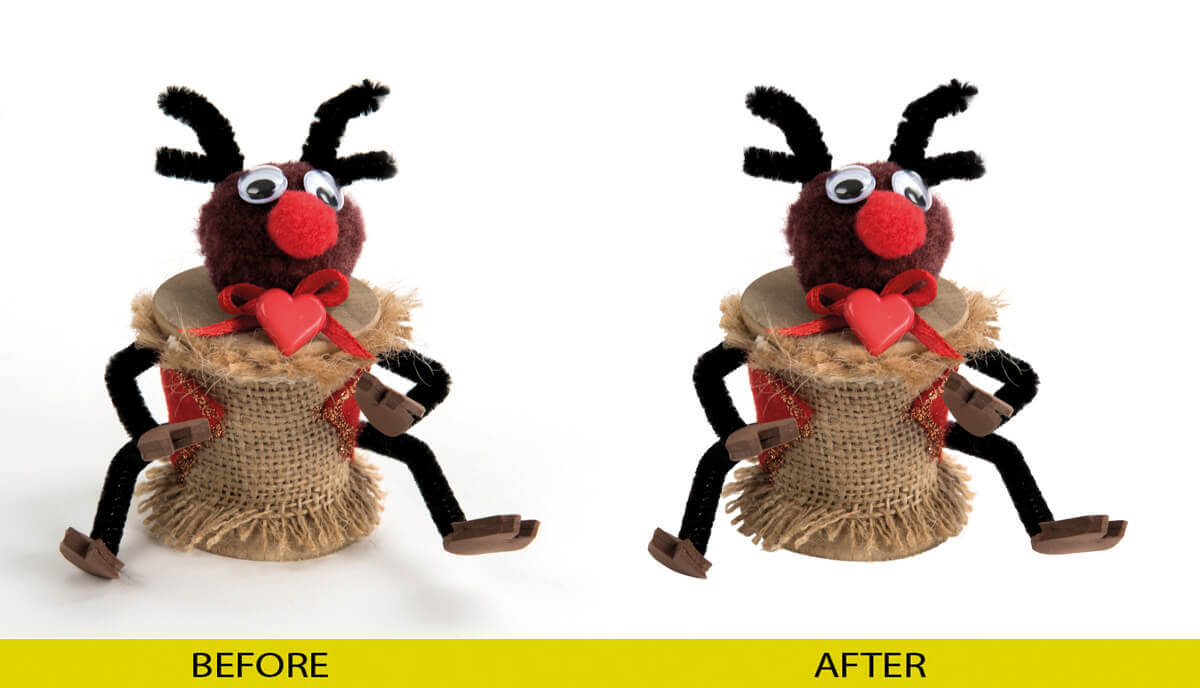


In one way the masking before image does not seem to have anything wrong with it. It can be used straight away. However, this type of image is masked and object cut out in order to place it against another more interesting background. The task of the photo editor is easy with this type of image and he can use simple masking techniques to achieve the goal. This is because the object stands out clearly against a white background. A close examination shows that except for the eye region, all other areas can be masked quite easily without intrusions or exclusions. A little bit of care is exercised in making sure that the background masking does not cover the eye area as well. One may use a fine tipped brush to draw an outline of the eye to protect it against being selected using the masking technique.

The before and after image shows Photoshop image masking applied in a professional way by using the pen tool to start with and fine tuning it to follow complex contours of the strings and further adjust by stroking path and converting it into a selection. A simpler way is to use the magic wand tool provided the background is of an even single color and the object stands out. One can select multiple areas and further fine tune it by expanding or contracting selection. The selection may be converted to a clipping path if so desired. If masking works, such as using layer asks with associated tasks, there is no reason to not use it.  Layer masking techniques may be combined with feathering and use of brushes to erase unwanted areas. One can also make use of channels, contrast enhancement and other techniques to ease the selection process. Using a pen tablet, as most professionals do, helps you to be more precise in your brushing operations. Photoshop offers the flexibility of choices to arrive at the desired result and it is up to the deep etch artists to pick the right tool that will deliver the desired output.

A fanatic Photoshop expert may spend quite a bit of time manipulating images to get a natural look. However, there are other factors that must be balanced such as speed of delivery of output to client and costs. Knowledge of Photoshop does help in making the right choice and in completing the background removal in the shortest time and at the lowest cost but with no compromise on quality.


Source: www.clippingpatharts.com/clipping-path-vs-photo-masking-techniques-to-cut-out-background
Like Reblog Comment
text 2019-10-29 11:25
How To Create A Transparent Background In Photoshop

With the Photoshop magic now you can curate transparent product and logo images to publish it across the internet.


Most of the featured products on the websites look better without an image. This process can take some time for the complex objects, but with recent updates in Photoshop, it has been made easier. Moreover, this will help in creating catchy display options too. Like, with the Background removal, you can place your products with a transparent background against the background that changes the colors. Even you can use the image with a transparent background on the responsive websites that entirely depends on the screen size of the user.

Not only with the images, but you can also do it with the logo of your website too. You can remove the background in Photoshop of your logo. This will aid you in keeping your logo anywhere on the site irrespective of its background color. So, you can save your product image or logo in the web-ready format using Photoshop.

Steps to Create Transparent Background for an Image in Photoshop

Follow the below steps to create a transparent background for your product image using Photoshop:

  1. Creating your Image into the Layered File
  2. Creating your Selection
  3. Delete the Image Background
  4. Saving your Image in the Web-Ready Format
  5. Saving the Image File

Step 1: Creating Your Image into the Layered File

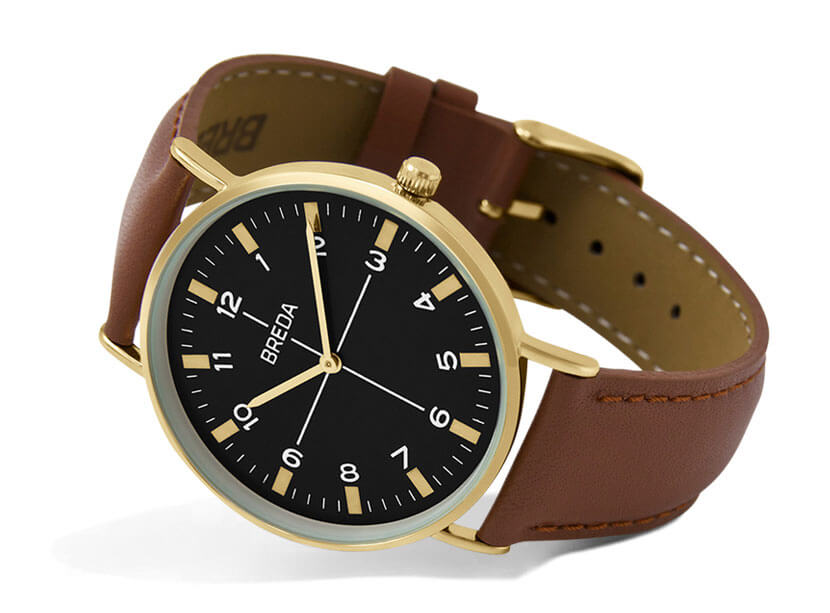
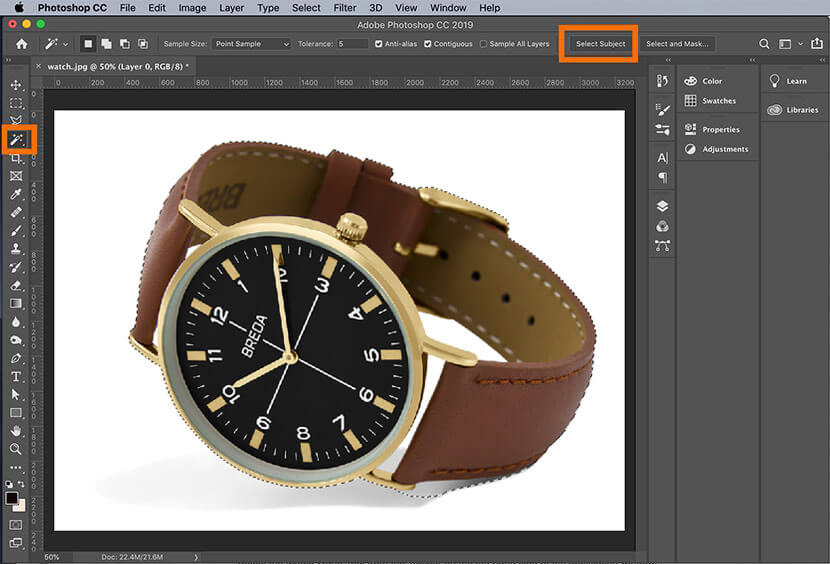
Firstly, open your product image in Photoshop that is in JPG Format. Like, use the image of the below wristwatch that is clicked against the white background.


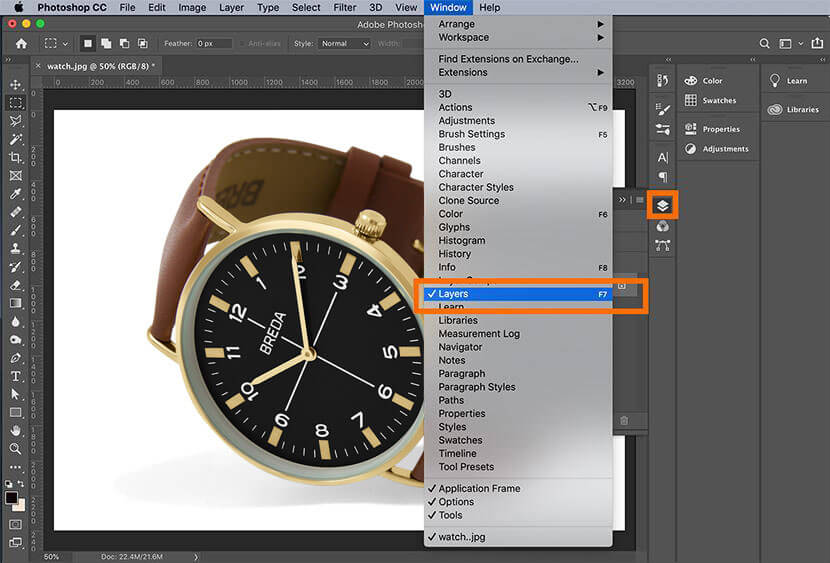
After this open the “Layers” panel that rests on the right side of your image window. In case, it is not accessible you can access it by clicking on Windows then choosing “Layers” from the dropdown menu. It lies on the top of the Application Window.


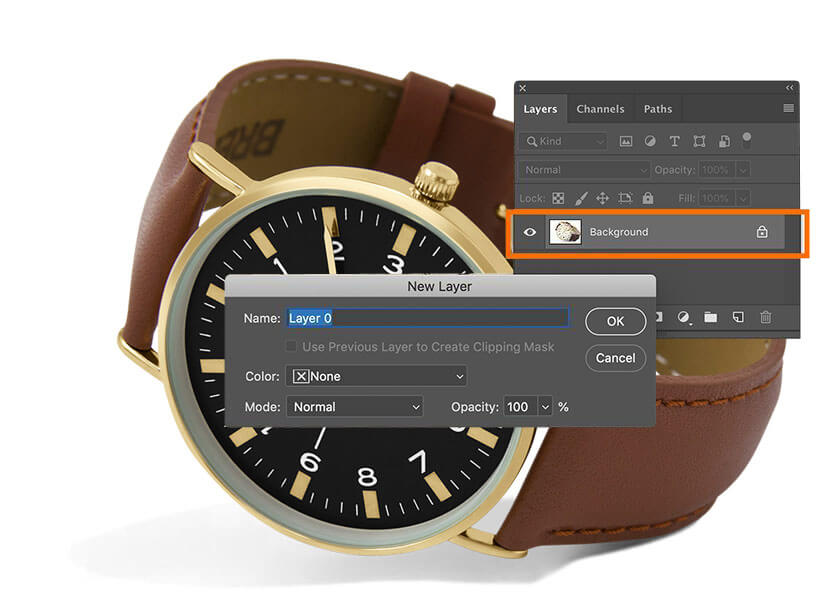
Now, in the “Layers” panel double-click on the “Background Layer.” Here, a “New Layer” dialog box will appear that will ask you to rename the Layer. You can leave this New Layer as default “Layer 0,” and then click OK.


With this step, you have unlocked your “Background Layer,” and now anything deleted from it will appear transparent.

Step 2: Creating Your Selection

While doing image editing to create a transparent product or background, the second step involves choosing the ‘Magic Wand’ tool from the Toolbar that lies on the left-hand side of the Application Window. At the top of the screen, click on the “Select Subject” from the “Options Bar.” Photoshop will select the object from your picture that is regardless of its background. You will see the selected area inside the ‘Marching Ants’ that is surrounding your image selection.


In any case, if you think that the image selection you did is not perfect, then you can use the ‘Magic Wand’ tool to remove more of the background from the selected image. Even you can add more of the product to the chosen area depending on its selection.

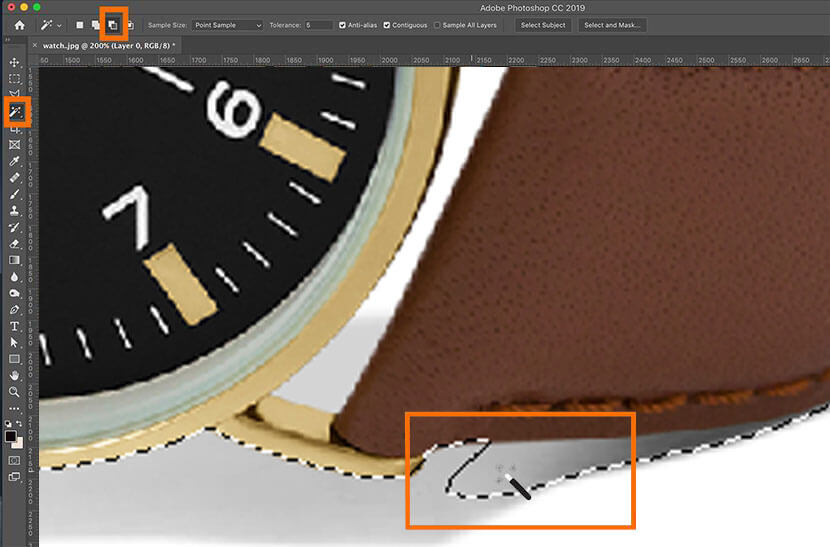
Like, in the above-featured image of wristwatch the Photoshop did not altogether remove the shadow of the watch from the selected area. For this, you can choose the ‘Subtract from Selection’ icon that lies in the Option Bar on the top. Now, click on the portions of the watch’s shadow with the help of the “Magic Wand” tool until the selected area only contains the watch.

One thing worth noticing here is that, while you are creating your selection, you need to select the areas where there are “holes” in your product image. As in the image below, where the face of the watch meets its wristband.


Step 3: Delete the Image Background

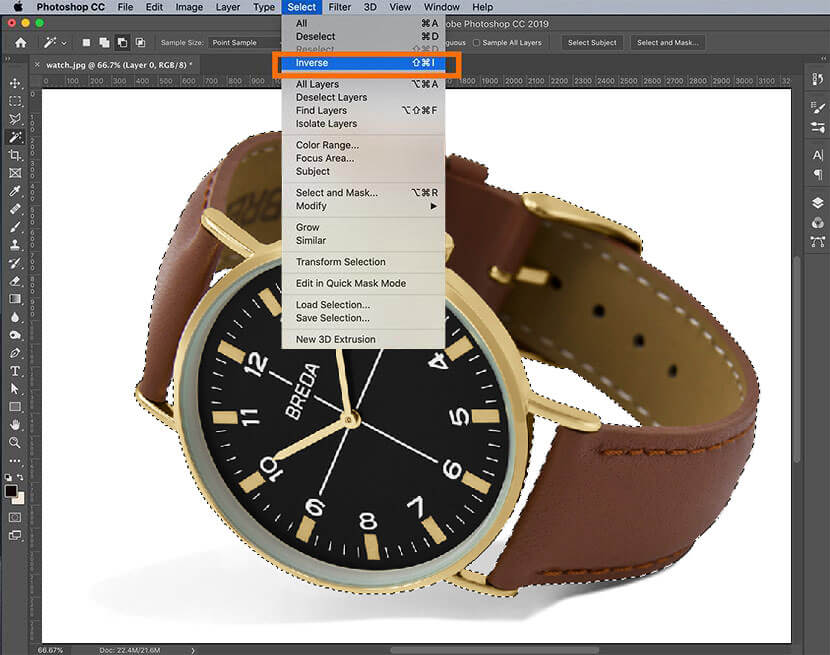
With this above step, you have selected your product. Now, by clicking on the “Select” from the top bar, choose “Inverse” from the dropdown menu, or you can select the “Inverse” option by typing Shift+Ctrl+I or else you can type Shift+Command+I on your MAC.


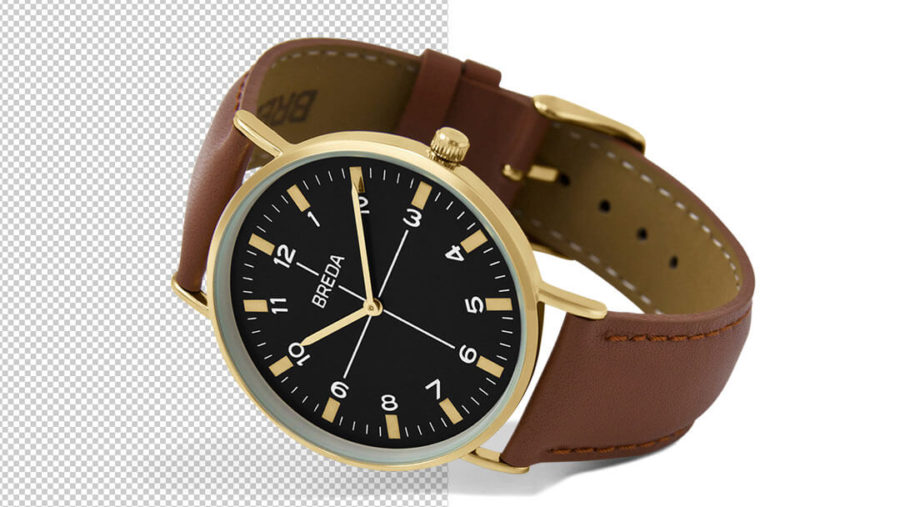
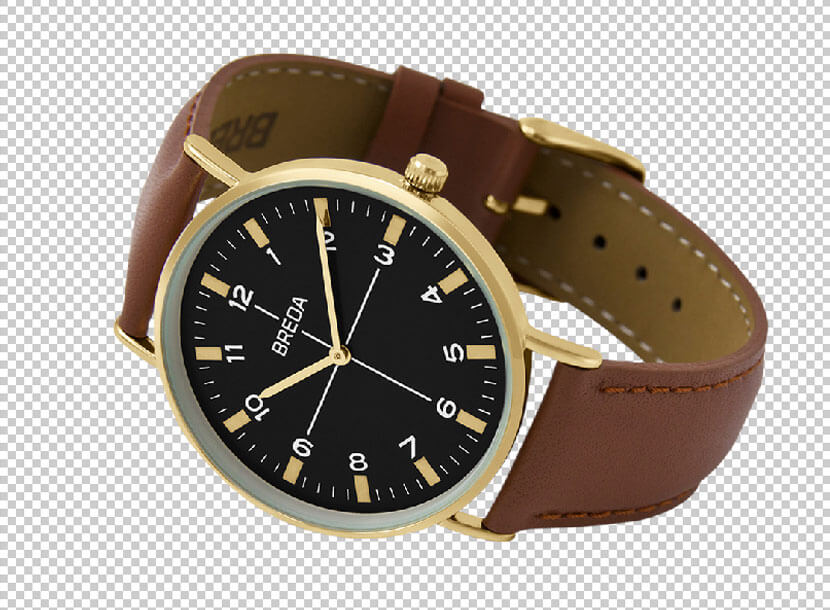
As you have selected the ‘Inverse’ or Background, so now, type ‘Backspace’ or ‘Delete’ on your MAC. This will make your product background transparent. In the Photoshop software, the gray and white checkerboard pattern represents the transparent background like in the below image.


If you want to deselect your selection, then you can type Ctrl+D or Command+D on your MAC system.

Step 4: Save Your Image in the Web-Ready Format

The creation of a transparent background using the Adobe Photoshop software is just the first step. But, make sure you save the file in the proper format. It will help in displaying it in the correct format on the owner’s E-Commerce website. The best format is to save your image as the PNG-24 Image file. The reason being, this format allows the multiple layers of transparency. It means that the image you just saved will not possess the “Pixelated Halo” when it will be placed on the background of the different color.

Moreover, the old file image formats like GIF and PNG-8 can create an undesirable ‘Halo’ effect. So, it is great if the user uses the PNG-24 format.

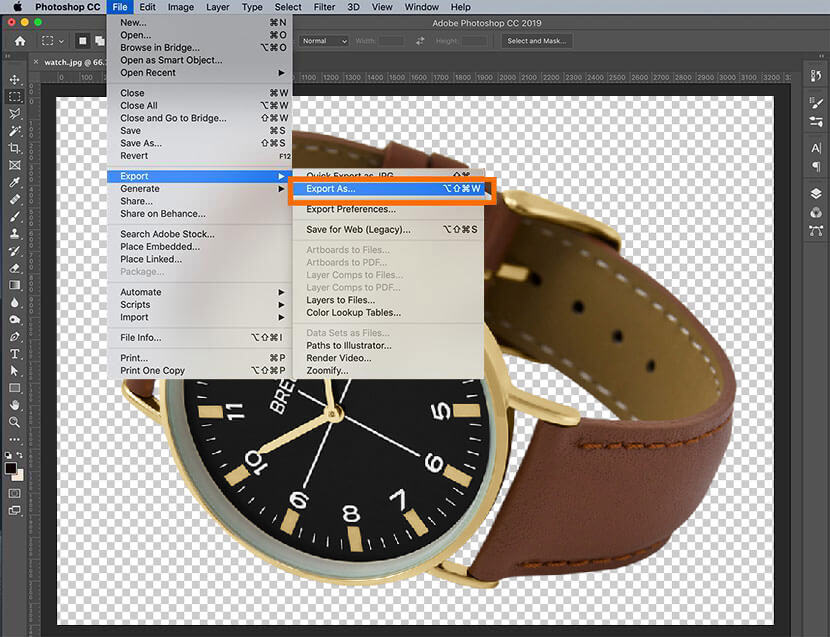
You can save your file as the PNG-24 in the Photoshop CC software by typing Shift+Alt+Ctrl+W or type Shift+Option+Command+W on your MAC. You can also choose File, then click on “Export” and after that choose “Export As” from the dropdown menu that is located at the top of the Application Window.

Note: One thing worth noting here is that if the user is using the older version of Photoshop and did not get an option of the “Export As.” Here, you can choose “Save for Web” and then select PNG-24 from the already preset dropdown menu that is located at the right-hand side of the dialog box.


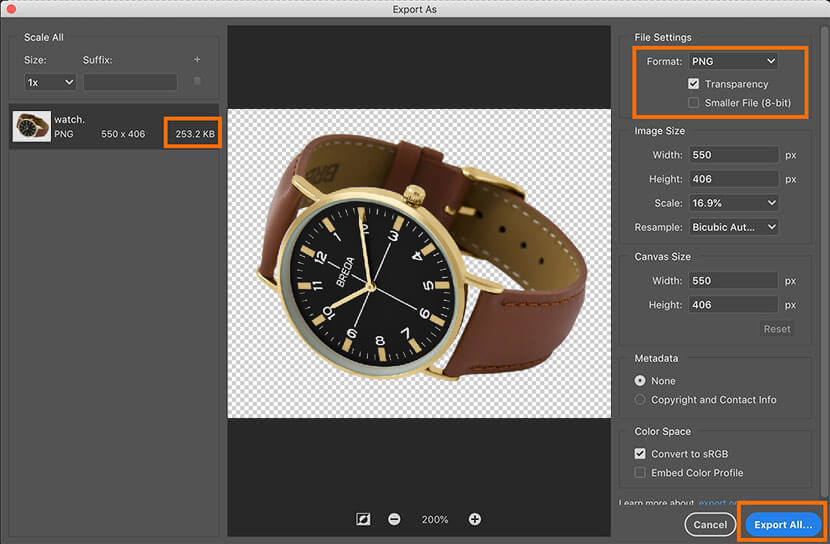
The dialog box that appears under the ‘File Settings’ on the right-hand side of the box, from there you can set the file format to PNG. You need to check the ‘Transparency’ box. One thing you need to be careful about is that ‘do not check’ the ‘Smaller File (8-Bit) box. This will convert your image file into the PNG-8 file.


Here, on the left side, you will see the image size that is predicted for your PNG file. It is essential from the perspective of your website since larger files will make your web page load slowly. You must keep the web images around 200KB or a bit smaller.

Under “Image Size,” on the right-hand side of the dialog box, you can adjust the dimensions of your image. The smaller dimensions will create a small file size, and you do not require much smaller images too, as this will appear blurry or Pixelated on your webpage. Most of your consumers will be viewing your product on a retina display, so save your product image at 50% to 100% larger than the size you expect to display. The image will look crisp on mobile or desktop devices. Likewise, if you know that your product will show 400px wide that is at its maximum, so make sure to make it 600px wide.

Maintain a balance while working with maximizing your image size and minimizing your file size. If you want to save your website loading time, then save your featured products for the larger retina display and save the bulk of your product images at actual size.


Step 5: Save the Image File

After setting your images to exact proper dimensions, click on “Export All.” You must save your web-ready images in the “Save Dialog” box folder. The owner must keep the optimized file images separately from the original file images. It will remove any confusion while loading your images to the website. Set the name of your image file and set its extension to .png. Now, click on “SAVE.” After this, you can place your ‘transparent product picture’ against the different background and display it correctly.


Overview of Steps to Create Transparent Background for Logo in Photoshop

The logo of your website must also possess a transparent background. This will provide you the flexibility in displaying anywhere on your webpage. If the Logo is saved as JPG, then remove the background in Photoshop and then save the file in the form of PNG-24. Even if the Logo is in vector file with extensions like.AI, .PDF, or .EPS, then also open the file in Photoshop and convert to PNG-24 to make it website ready. The essential steps are described below:

Step 1: Open the Logo File in Photoshop

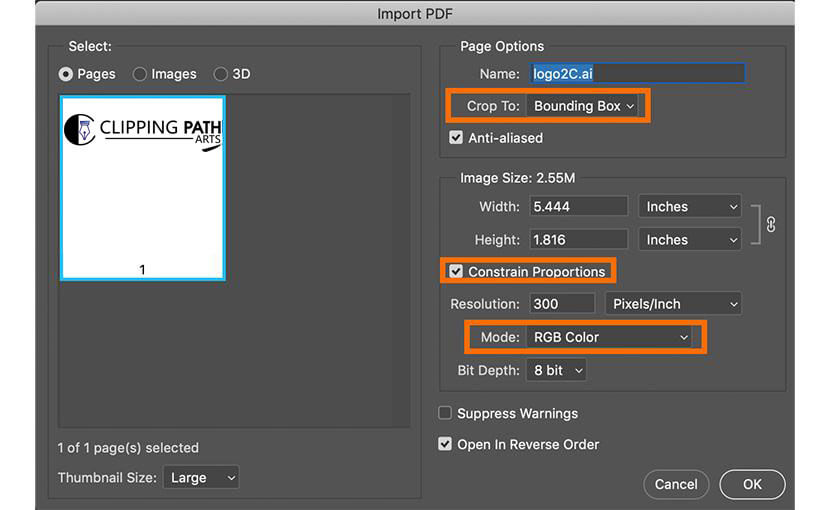
Open Photoshop, click ‘File’ then ‘Open’ and navigate for your Logo File. The .JPG or any other raster format file will open in Photoshop. If you are opening the vector file format, then correct the settings in the appeared dialog box, like

  • “Crop To” that is set to the “Bounding Box”
  • Check the Constrain Proportions
  • Set the Mode to the RGB Color
  • Click ‘OK’


Step 2: Making the Background Transparent

You can skip this step by using a Vector File. However, if you are working with the JPG file format, you need to select and then delete the background from the image. As did above, when the product image background was made transparent, so here also ‘double-click’ the Background Layer in the “Layers Panel.” Then, click OK to convert the “Background” to “Layer 0.” But, the selection of the logo file is slightly different from the product image. The reason here is it has all white background.

Choose the “Magic Wand” tool from the Toolbar, click on the white background of the “Logo File.” If you are selecting the multiple areas, then hold down the “Shift key” and click on the Magic Wand tool to add to file selection.


After selecting the whole Clipping Path logo background, type Backspace or Delete on MAC. It will now display the transparent background that is represented by the white and gray checkerboard pattern.


Step 3: Save the Logo Image as PNG File in Photoshop

You can follow Step 4 and Step 5 explained above under “making image background transparent” to export your logo file in the form of PNG-24. The steps will be the same for any file format even if your original file has an AI, PDF, JPG or any other file format. The exported file image size will be slightly lower than the file size of “transparent background product image.”

The fact is the logos have only two colors as compared to the product images. You do not have to reduce the proportions of your logo while saving this file. The dimensions will remain the same as that of the actual file, and after that, click “Save.”

Finally, these are the detailed steps if you want to create a transparent background for your image or logo file in the given formats. This will help in making the image display amazing on your website without slowing down its speed.

Source: www.clippingpatharts.com/how-to-create-a-transparent-product-in-photoshop
Like Reblog Comment
text 2019-07-29 07:13
How to Use the Photoshop Pen Tool to Edit E-commerce Images

How to Use the Photoshop Pen Tool to Edit E-commerce Images

In the epoch of eCommerce image & computing software, the advancement is humungous, and by the looks of it, there is no stopping of the same. One of the advanced computing software in use for the past many years has been Adobe’s Photoshop.


This has been a landmark software in many ways. Innumerable people have found this holding some of the best and advanced tools for photo editing. In the era of digital pictures, there are over 100’s of editors in the industry but none like Photoshop.

The usage of Photoshop in industry level editing has been a talking point. With numerous brands and companies using these tools for editing, the usage in e-commerce industries has proved to be highly beneficial. For instance, if you are aware of seeing images of different products in alternative angles with exceptional detailing and quality, Photoshop has a significant role to play.

This is one of the application in e-commerce images, in one of those industries, where these can prove to be the difference from a person buying and skipping. Therefore, tools in Photoshop are entirely responsible for editing these images and sometimes, support the overall setup. One such significant tools in Photoshop is Pen Tool, having abilities in plenty for editing e-commerce images into a new face.

Importance of Photoshop Tools

Adobe Photoshop has an immaculate application in the world of multimedia. The software is incomplete for usage, without the existence of online tools for editing. Tools are vital for making a static modification of images, and some tools add to the makeover of images. Aside from these tools, image alteration, and reduction of specific camera-related issues can be altered using Adobe Photoshop.

It can be argued of the usage of the same in some other editing apps today, but none comes with as much-stacked features in comparison to Photoshop Pen and its tools. In simple words, tools are essential in Tools are the base of this critical editing software.

What is Adobe Photoshop’s Pen Tool Feature?

Photoshop Pen Tool is a critical tool, used extensively for creating shapes and path formats. The design is set for being controlled and copied for creating advanced portions and while performing masking. A pen tool is considered for its high quality and precision-based outlining, making Photoshop, an essential tool of design. On how to use the pen tool in Photoshop CS6, this requires an explanation.

Pen Tool has a better utility than the likes of brush and pencil tool. Unlike drawing pixels, a pen tool is instrumental in creating a pen tool vector-design when the path is used.

Location of Pen Tool in Photoshop and General Uses of the Software

Pen Tool in Photoshop is located on the bottom middle of the main toolbar. Alternatively, holding P in the keyboard will open the tool over the image project. Click the Pen Tool and hold; you can see five different options. In case of the latest model versions, one more option is added in the list.

Here is a small list of options available with Pen Tool:

  • Regular Pen Tool
  • Freeform Pen Tool
  • Curvature Pen Tools
  • Add Anchor Point Tool
  • Delete Anchor Point Tool
  • Covert Point Tools


While talking about the primary advantages of Pen Tools in Photoshop, here are the major talking points, including,

In terms of modification, reusing the paths and structures designed using a Pen Tool; the feature is useful in moving a product image from the background.

Pen Tool is used in changing the color of a specific portion of a product image, removing background or making selection. Users can avail multiple paths within a single image and create several paths alike.

One of the most significant plus points of the tool is the ability to design shape paths. With this clause, users can create customized shapes over the image and even over specific locations of an image. Since Pen Tool does not dictate on specific shapes, like a rectangle or circle or even oval tool, this is the most significant advantage offered.

Methods to Design a New and Existing Path Using Pen Tool

If the user is dealing with any version of Photoshop, here are the basic Pen Tool variants, used in creating new paths includes,

  1. Regular Pen Tool
  2. Curvature Pen Tool
  3. Freeform Pen Tool

For existing paths, the remaining options like add anchor point tool, covert point tool, and delete anchor point tool, are instrumental.


While creating a new path, it is recommended to look up to the setting of Pen Tool by looking up either shape or path in the options tab over the application bar. While using the Pen Tool, this opens up a new work interface and appears in Layers and Paths Panel.


In terms of setting change, users can change aspects like thickness, pixel size, fill color points, length, and width. These are customizable in every individual path layers.

Next up, while choosing a Path, there is an option for making an initial path and creating it to be a selection, and this comes in the form of Combine Shapes.


More about Path Panels

Pen Tools have a major role in designing path structure, which invokes the role of Paths Panel. The Panel is always available in any working interface, and they are located on the Paths tab located over Layers Panel. Alternatively, one can click on the Windows tab and a drop-down box will open up, containing various options.


Using Pen Tools for Creating a Path

Here comes the challenging part of the lot. Making a new path is a challenge for a newbie and there is a possibility of a blunder. With the tool, designing curved paths or straight paths are no more a hassle with practice. For starting up the proceedings, here is the systematic guide,

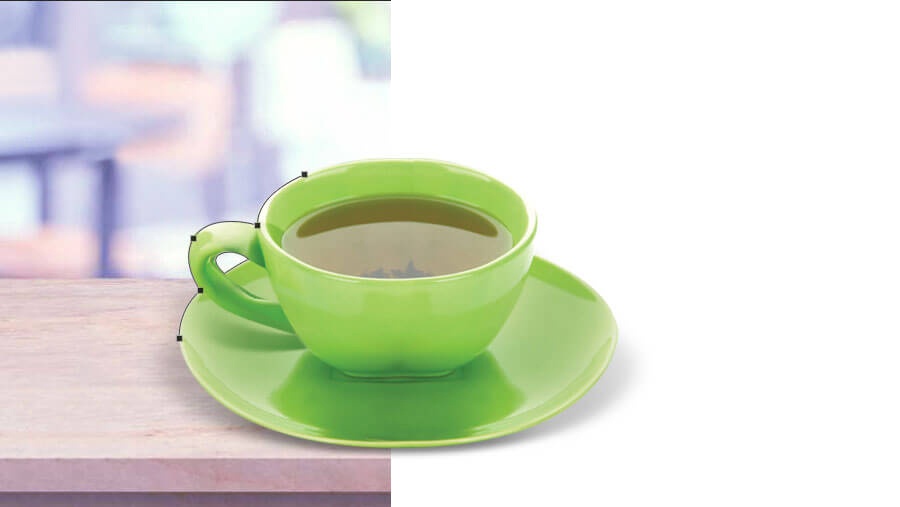
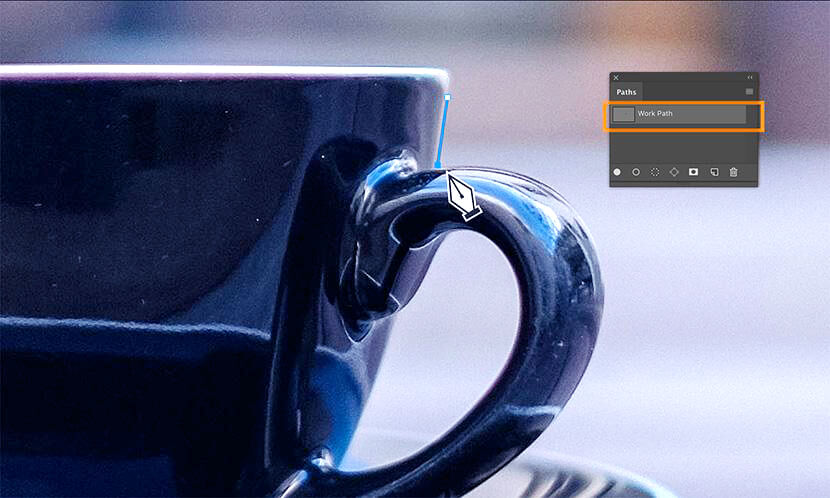
Start from a point, which is at the border of a vertical line. For instance, the boundary of the image of a coffee cup below:


Next, up, click on the other edge of the entity with the Pen Tool and by all probability, there will be a vertical line. On the Panel beside, a work path appears when another point is selected.


For Curved Objects Paths

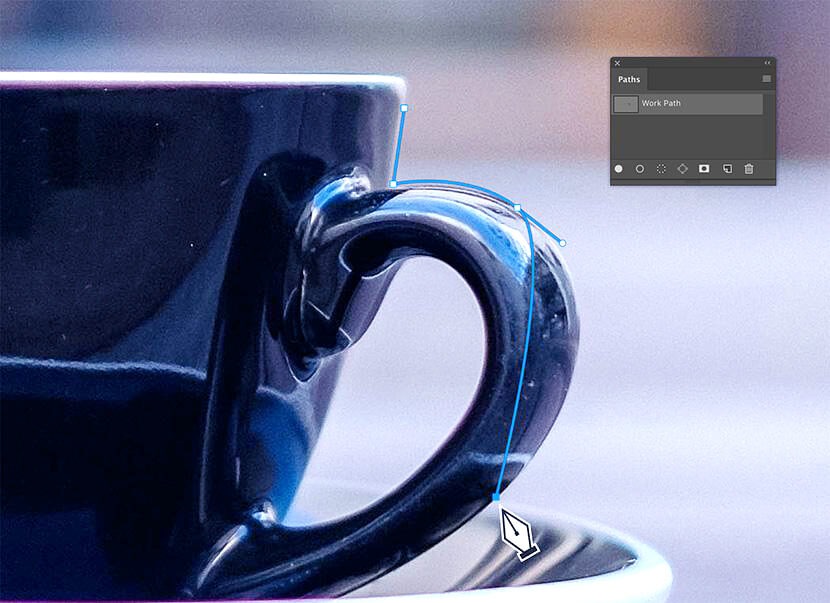
Keeping up the Pen Tool in curved objects is no more a task. Using the Pen Tool, the next step requires choosing the sub-sequent point and dragging the Pen Tool holding the mouse. At this point, a tangential line called as Handles appear over the curved surface in the object path. Users can drag the mouse until a point they get the desired shape of a curve.


Users should take note that handles are formed with curved lines appearing previous and following the tangential point. Hence, the forthcoming section of the path to be drawn after making a curved line. It will keep up with the path of the handle from the final plotted point.

On clicking the subsequent point, make new handles by dragging the mouse and adjusts the curve appearing alongside the new point.


Making a Straight Path after a Curved Path

While using a curved pen tool, if a user wants to halt the next point from forming a handle in the next point, then click on the next corner point with the mouse and hold ALT key. It will assure another handle vanishing.


Follow up with:


Close Your Path using the Pen Tool

If the plotting of paths is complete, as a user, you require in triggering to the first point of contact in the image. A tiny circle appears to the right of the Pen Tool and click over the point. This will bring in curtains to the overall path.


Saving the Project Path

While using Pen Tools or any of Photoshop tools, it is mandatory to save the path. For doing so, click on the Work Path in the Panel and save with an assigned name..


Tips to Alter Created Path using the Pen Tool

If you are accustomed to creating new paths over time, the next point comes is a modification. Although optional, modification is a perennial process in any design, let alone paths. For doing so, open the Photoshop Paths Panel and choose the saved file.

Tips to Create New Paths over an On Hand Path

In the previous path design over a coffee cup, there was a requirement of a path design around the cup. The next task requires removing the object from its background.


In addition, a new path is required inside the handle of the cup.

Choose the path and select Pen Tool. Go to the options bar and click the Exclude Overlapping Shapes option.

Once selected, the existing path will be visible. You should draw the areas, which you do not want to get included in the design. When we select from our path, later on, the area with the latest path will be eliminated from the remaining of selection.


Ways to Alter Existing Points and Paths

Modifying an on hand point or a handle over a path, choose the path selection tools. These are located under Type Tool.

Select the Direct Selection Tool and this will disclose all the points in the form of a white box, including handle points. With the tool, it is possible to move along existing points and curves.


Adding New Points in a Path

In the list of toolbars, users can click over the Add Anchor Point Tool by press holding the Pen Tool option. Users can drag the mouse with the tool opted and plot the paths pointwise. Once the plotting is done, Direct Selection Tool comes in handy to modify handles and point’s location.


Way to move out Points from a Path

In this case, users can remove any point from a path, irrespective of its location. This is done using the Delete Anchor Point Tool, located on the Pen Tool option of the Toolbar. With the tool activated, users require clicking an existing point, allowing the tools to vanish the points, and the adjacent segment will merge to the nearest point.


What is the Convert Point Tool? How Does it Help?

This is the last tool in the list of Pen Tools and can be accessed similarly as any other previous Pen Tool variants. With the tool, it is possible to control the handles over existing point in the same process of managing via Direct Selection Tool.


The difference, however, sees the Convert Point Tool does not facilitate moving along with on-hand anchor points. This is because, unlike the Direct Selection Tool, the path segments with Convert Point converts straight lines into curves and contrariwise.

On clicking the point having a handle with the Convert Point Tool, these points vanish and the anchor point turns in to a corner. Now, if the adjacent point has more handles, these will continue affecting the curve of nearby path segments.


On using the tool, click over another anchor point without a handle, these will start gaining handles on any side and can be further controlled with either Convert Point or Direct Selection Tools.


Making a Selection from a Path

Open up the Paths Panel and choose your desired path in this segment. Click over the icon located at the lower half of the panel, bearing a resemblance with a dotted circle.


Even by using a Pen Tool, a selection is possible. Over a selected path, users require simultaneously clicking Pen Tool, and the Selection button opted in the options bar.


One dialog box will pop up, permitting you to add your customization and modification ideas to the selection of a specific path. For users planning to isolate using the selection option, and keep the likes of Anti-Aliased box checked and feather radius as zero in the rendering segment. In case of a new selection, a radio button will appear beside the New Selection Option.


Once the selection is complete, users can change and customize the object color or even eliminate the object from the existing background.


Way to Separate an Object and its Background

Now that you have created a selection from a path, next up, you can separate the object from its background by creating a new layer mask or barely pasting over another layer. For doing this, you should be in the layer where you are supposed to work.

Removing by Copying a Selection

Users can copy using regular CTRL+C and pasting by using CRTL+V command on a Windows device (COMMAND+C and COMMAND+V in case of MAC). This will paste the selection in a new layer. Also, you can remove the original layer to spot an isolated object.


Eliminate a Background with a fresh Layer Mask

For developing a fresh layer mask, you can use the Layer Mask icon available on both Paths and Layers Panel located lower end of the panel box. It appears like a black circle within the white rectangle.


Select over the icon to make a Layer Mask automatically.


Tips to Make a Shape through the Pen Tool

The shape is the biggest challenge while defining any object and sizes. You can choose a specific path to create Shape Path from the Options bar on the Pen Tool.

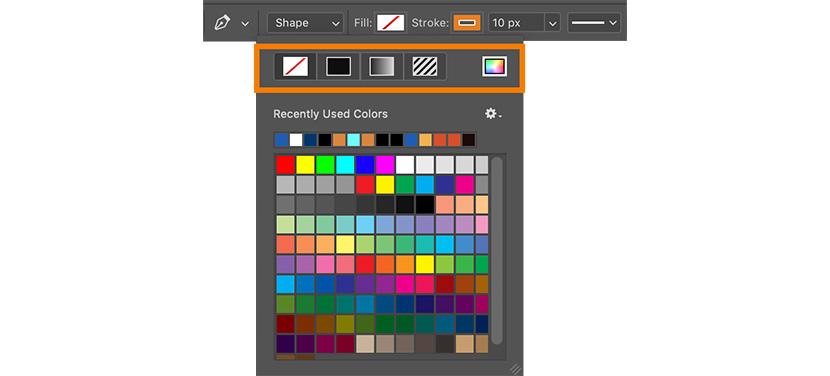
Next up, change the color of shape by double-clicking the color rectangle, located next to the Fill option. A color menu will display. It will allow you to fill with a set of solid color, gradient color, custom color, and a pattern.


You can change the outline color of the object by double-clicking on the color rectangle, located next to the stroke option. All other adjustments, right from the width of the stroke, changing of width the drop-down menu, next to the Stroke’s color is possible.


On setting up the Shape Path’s, drawing an object with the Pen Tool would result in the way of drawing an ordinary path.


While creating an object using the Pen Tool, a by default, a new layer holding that shape appears in both the Paths Panel and Shape as well.


Way to Scale or Make Over a Shape Path

Using the Shape Path chosen in the Paths Panel, click over the Edit-Drop down menu, locate at the upper half of the screen, and opt the Transform Path to use the function. Also, put it simply; click CTRL+T in Windows device or COMMAND+T in case of Mac or even rotating path. In the end, using transform functions available, you can change a regular path also as you wish.


Uses of Other Photoshop Pen Tools in the Subject

Using a regular Pen Tool from Adobe Photoshop gives an ultimate operative in your hands over-controlling of paths as you design the same. Based on the needs, other Pen Tools may help you with different projects. Pen Tools have the power to churn out shapes of various patterns, and all relatable types of Pen Tools follow a different model of design.

Different types of Pen Tools

Curvature Pen Tools: This useful tool is highly beneficial for determining the curve between different points. Unlike regular Pen Tools, a user does not require in clicking and dragging of the same. This means, there are no handles available, and this easily takes up the shape of the structure object.

Curvature Pen Tool is useful for following up a uniform shape, including the likes of an arch or even a circle. Once a path is designed, the tool can be used extensively with the tool behaving like the one with Standard Pen Tool.


How to Use Freeform Pen Tool

This Tool has a critical property and makes a path as a user draws with a mouse freely. Using the tool, a user can draw with the Tools in the same pattern, which they would use and create an object with a pencil tool or Brush Tool.

Paths designed with the Freeform Pen Tools are considered among the more robust tools to control and often requires an ample amount of modification after designing. For this, practicing will help in giving out useful ideas on how paths and plotting are controlled.


How to Use Magnetic Pen Tool

This is a unique tool, which is accessed by selecting the Freeform Pen Toolbar. You can find the magnetic checkbox in the options bar. Using this unique tool, Adobe Photoshop tries to identify the edges of an object and eventually breaks the path.


Application of Stylus with Pen Tool and Photoshop

Pen Tool has a relatively more comfortable usage application with stylus and using the mouse with Pen Tool; you can design points with handle curves by drag and click option. Using a stylus, both forming and creating points and handle curves are possible.

Final Thoughts

E-Commerce business is thriving today, with Adobe Photoshop’s picture-perfect image editing options. It is a general understanding that large chunks of people are fussy about detailing and examining the images of a product. With Adobe Photoshop’s Pen Tool, editing and modification of a specific product image and change of background and utilities are pulled off easily. With the understanding of the product as a whole, a person can examine and read about the utility of the product. Clipping Path Service is a reputed and proficient firm offering comprehensive image editing and other allied services.


Source: www.clippingpatharts.com/how-to-use-the-photoshop-pen-tool-to-edit-e-commerce-images
Like Reblog Comment
text 2018-11-08 09:18
Photoshop Background Delete Technique with Photoshop

Photoshop can be very handy yet very time-consuming. It takes the longest time of working when you have the complex image to edit. It is highly recommended by the entire editor and the photographers as well. It creates images flawlessly beautiful where you shall not find any flaw or foreign object that might disturb the viewers. The image editing is all done with it not only because it retouches well but also it improves the image quality, unlike other alternatives. You will find many images that have the techniques to alter the images but they will not improve the image rather will cut out the quality and make it worse.


The image quality depends on the image itself though; if you have a low-quality image then none have the ability to make it better. High professional cameras are used to click the images and then they are all edited under Photoshop. Clipping path service is the most used technique here that does most of the works. It is the most basic work that all the images need. It draws lines along the edges of the product and selects the product only that helps to detach the product from the other objects; the main object that we are all concerned about is the background here, the background is deleted with the pen tool from the toolbar. It helps to cast out the background layer and add a new background layer. The background layer is added when the layer is deleted. After deletion, you will see the transparent background that indicates that the background should be changed with the other background. The other color background is used here. You can use the white background or any other color background. The white background is mostly used here, it helps to stand out the products more, and if there are more other colors present then it will help to reflect them all. The whole process of the removal and addition of the new background is known as background removal. This process is the most used process for the products and other images where the background needs to change with any other backgrounds.


For apparel images, it is really important to make the image look very interesting and so it chooses some of the editing techniques that the image might need and among them all these are some edits that you would be definitely needed along with the background removed. Color correction is in the top of our list as it saves time and is quite easy to go with. It finishes within minutes without any mess or any mixing. The clipping path service here goes along the edges of the product to select the part of the product where the color changing needs. Parts are all selected with the clipping and then the parts are all changed with the colors that the original product color is in. Apparels come in the same design but different colors. The colors are all change

d as the real products. If you want you can use the desired color as well but it will create a conflict with the real product and the image which might even damage your reputation. The more the colors the more option of the products you get which is really a great impression for the images and company.


The ghost mannequin is another awesome trick here which can be used on the apparel images when the models are not available and you have bulk products to click in a less time. And so the images are all clicked with the mannequins wearing the product, which represents the product only. The mannequin remove is done with the background removal service that deletes all the odds and replaces with the fine image edits. The white background is made here and blended with the mannequin removed layer so that the image is found as an invisible person is wearing the product and representing the parts of the images like the tags, labels, this helps the apparel company a lot to make the buyers know about the products. This phantom is loved by all the consumers and so the effects are all done with the Photoshop. It helps to remove all the odds and other objects that need to be removed.


The image editing not only ends here if you are working of the product images then you will need some of the extra edits here too like-


Resizing- it is a must of the images, heavier image size loads the pages of the sites slow which makes the consumer turn to another site. The heavier the image size the slower the page gets. The slow-moving pages are always hated by the consumers. No one likes the slow loading pages. The faster the page is the faster the images are seen and they will choose the product on your pages first.


Rotating- this is not always needed; it is needed when the image is rotated to some other directions and it needs to be rotated in the middle so that you can see the image to be in the middle and in the focus of the consumers.


Saturation and Exposure- The exposure and the saturation all depend on the image, if it is lacking some of the exposures then you will always need to add some of the saturation and the exposure so that image looks more interesting and seen easily. The image might also need some of the contrast as well; this is needed when the product edges are hardly seen.


Cropping- it is needed when the subject is not in the middle and out of focus, the cropping helps to cut out the extra sides and the parts of the image and keep the subject in the middle. It also helps to make the image look more focused and the products are easily seen.


All are above are the part of the image enhancement, you will always need it to make your images stand out more but if you don’t use them then you will never get the images as per your demand. And always maintain the layers in orders or else you will ruin the image and if you have huge numbers of layers then you shall not mark out the layer that you need to change and arrange accordingly.


More posts
Your Dashboard view:
Need help?