With the Photoshop magic now you can curate transparent product and logo images to publish it across the internet.

Most of the featured products on the websites look better without an image. This process can take some time for the complex objects, but with recent updates in Photoshop, it has been made easier. Moreover, this will help in creating catchy display options too. Like, with the Background removal, you can place your products with a transparent background against the background that changes the colors. Even you can use the image with a transparent background on the responsive websites that entirely depends on the screen size of the user.
Not only with the images, but you can also do it with the logo of your website too. You can remove the background in Photoshop of your logo. This will aid you in keeping your logo anywhere on the site irrespective of its background color. So, you can save your product image or logo in the web-ready format using Photoshop.
Steps to Create Transparent Background for an Image in Photoshop
Follow the below steps to create a transparent background for your product image using Photoshop:
- Creating your Image into the Layered File
- Creating your Selection
- Delete the Image Background
- Saving your Image in the Web-Ready Format
- Saving the Image File
Step 1: Creating Your Image into the Layered File
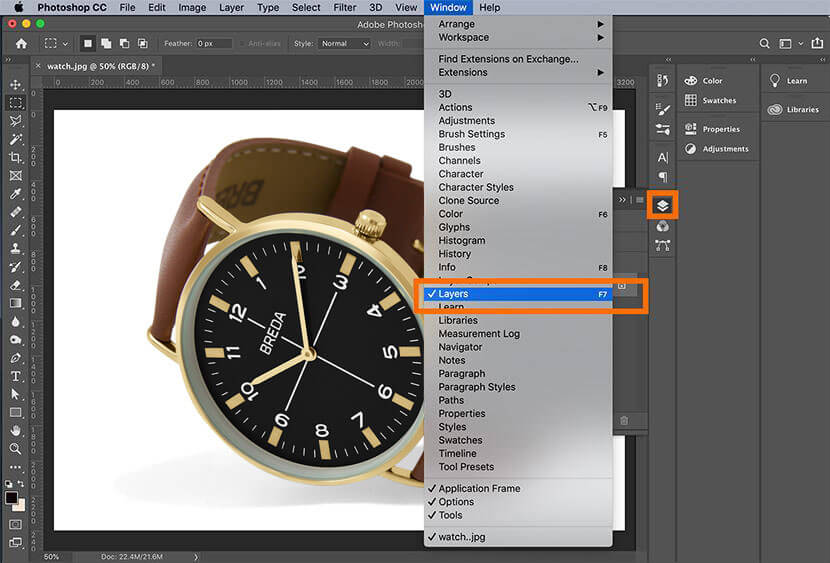
Firstly, open your product image in Photoshop that is in JPG Format. Like, use the image of the below wristwatch that is clicked against the white background.

After this open the “Layers” panel that rests on the right side of your image window. In case, it is not accessible you can access it by clicking on Windows then choosing “Layers” from the dropdown menu. It lies on the top of the Application Window.

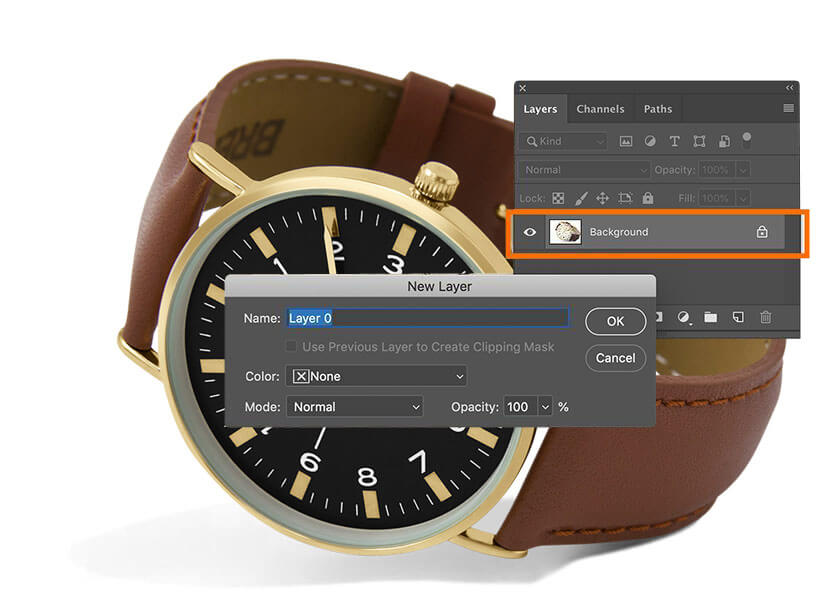
Now, in the “Layers” panel double-click on the “Background Layer.” Here, a “New Layer” dialog box will appear that will ask you to rename the Layer. You can leave this New Layer as default “Layer 0,” and then click OK.

With this step, you have unlocked your “Background Layer,” and now anything deleted from it will appear transparent.
Step 2: Creating Your Selection
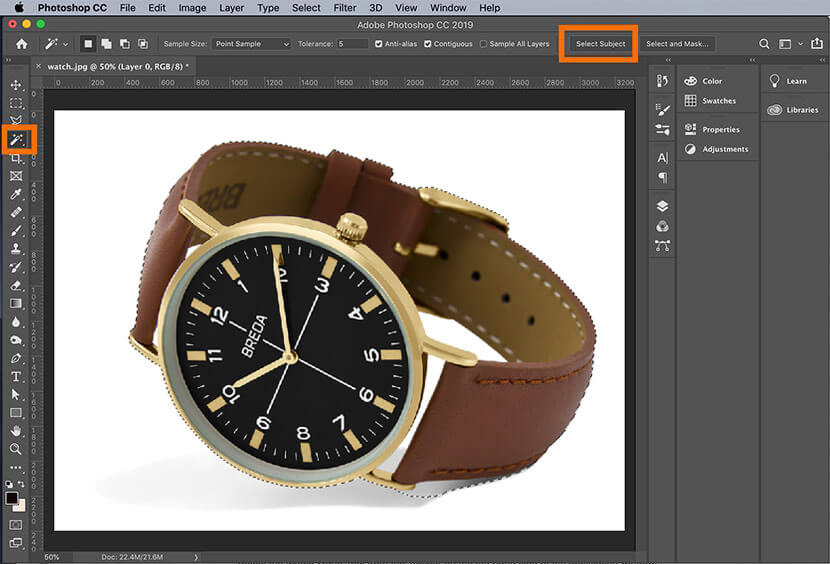
While doing image editing to create a transparent product or background, the second step involves choosing the ‘Magic Wand’ tool from the Toolbar that lies on the left-hand side of the Application Window. At the top of the screen, click on the “Select Subject” from the “Options Bar.” Photoshop will select the object from your picture that is regardless of its background. You will see the selected area inside the ‘Marching Ants’ that is surrounding your image selection.

In any case, if you think that the image selection you did is not perfect, then you can use the ‘Magic Wand’ tool to remove more of the background from the selected image. Even you can add more of the product to the chosen area depending on its selection.
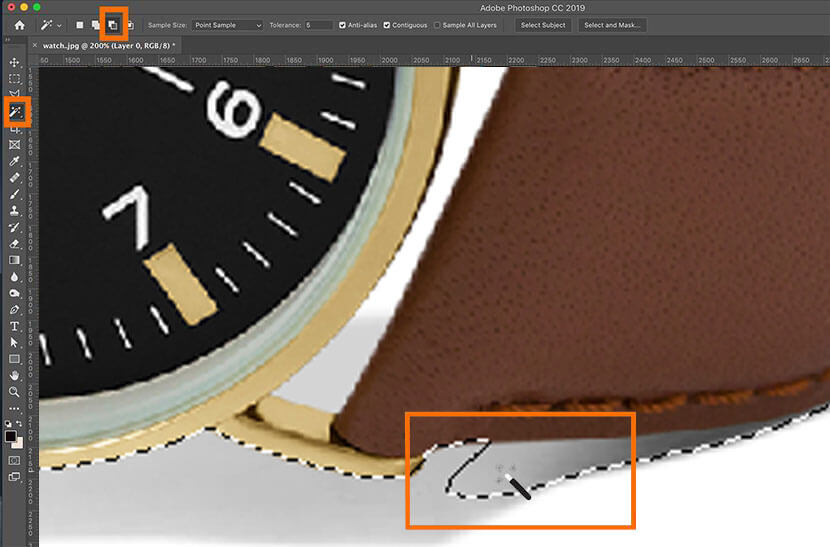
Like, in the above-featured image of wristwatch the Photoshop did not altogether remove the shadow of the watch from the selected area. For this, you can choose the ‘Subtract from Selection’ icon that lies in the Option Bar on the top. Now, click on the portions of the watch’s shadow with the help of the “Magic Wand” tool until the selected area only contains the watch.
One thing worth noticing here is that, while you are creating your selection, you need to select the areas where there are “holes” in your product image. As in the image below, where the face of the watch meets its wristband.

Step 3: Delete the Image Background
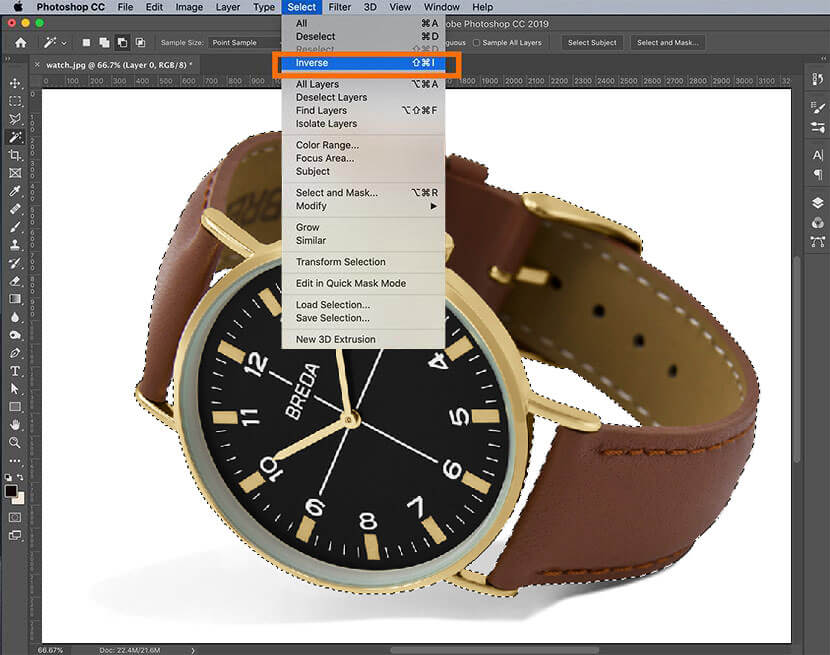
With this above step, you have selected your product. Now, by clicking on the “Select” from the top bar, choose “Inverse” from the dropdown menu, or you can select the “Inverse” option by typing Shift+Ctrl+I or else you can type Shift+Command+I on your MAC.

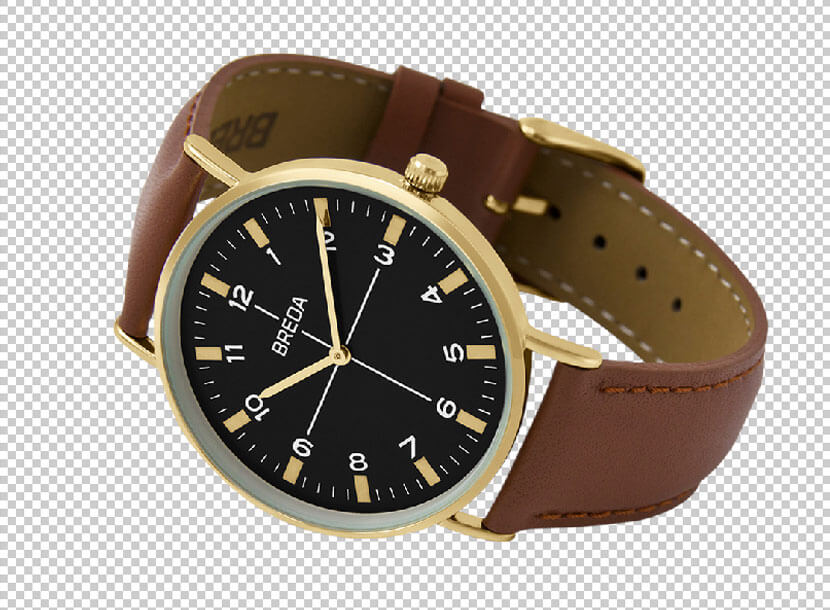
As you have selected the ‘Inverse’ or Background, so now, type ‘Backspace’ or ‘Delete’ on your MAC. This will make your product background transparent. In the Photoshop software, the gray and white checkerboard pattern represents the transparent background like in the below image.

If you want to deselect your selection, then you can type Ctrl+D or Command+D on your MAC system.
Step 4: Save Your Image in the Web-Ready Format
The creation of a transparent background using the Adobe Photoshop software is just the first step. But, make sure you save the file in the proper format. It will help in displaying it in the correct format on the owner’s E-Commerce website. The best format is to save your image as the PNG-24 Image file. The reason being, this format allows the multiple layers of transparency. It means that the image you just saved will not possess the “Pixelated Halo” when it will be placed on the background of the different color.
Moreover, the old file image formats like GIF and PNG-8 can create an undesirable ‘Halo’ effect. So, it is great if the user uses the PNG-24 format.
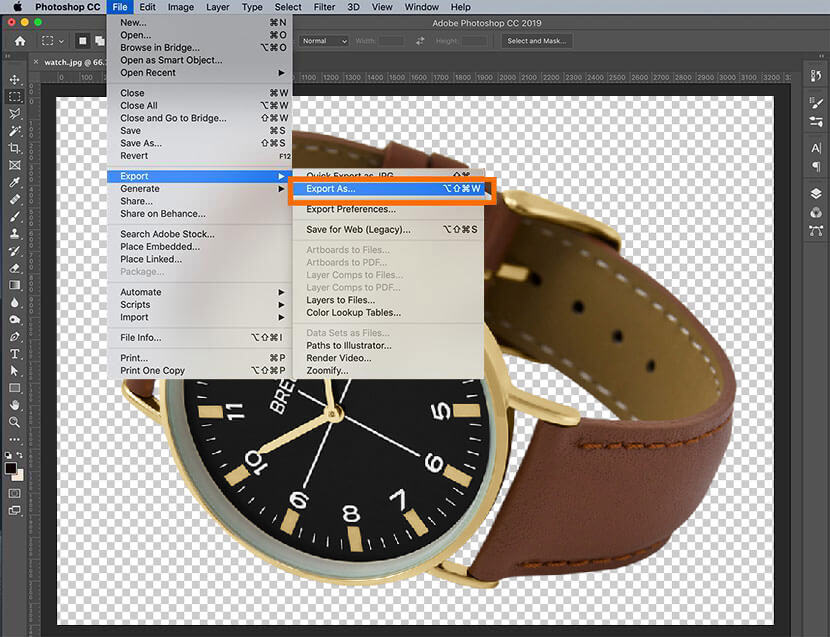
You can save your file as the PNG-24 in the Photoshop CC software by typing Shift+Alt+Ctrl+W or type Shift+Option+Command+W on your MAC. You can also choose File, then click on “Export” and after that choose “Export As” from the dropdown menu that is located at the top of the Application Window.
Note: One thing worth noting here is that if the user is using the older version of Photoshop and did not get an option of the “Export As.” Here, you can choose “Save for Web” and then select PNG-24 from the already preset dropdown menu that is located at the right-hand side of the dialog box.

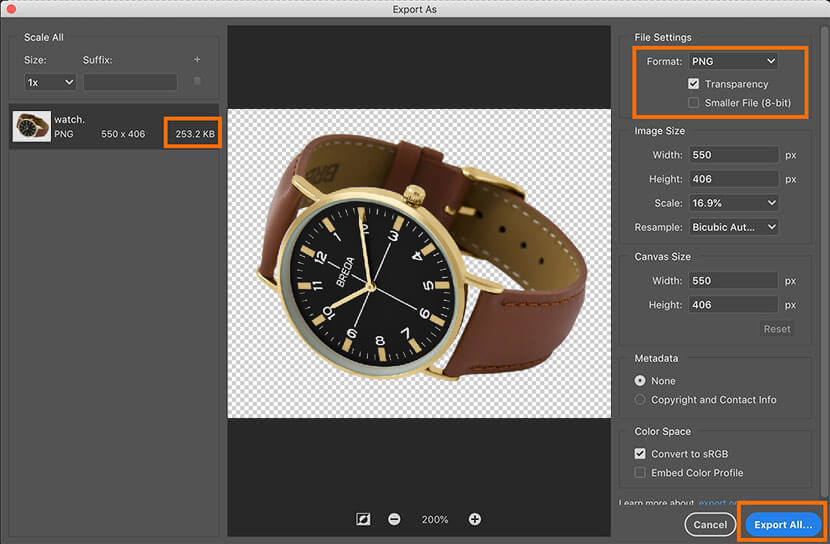
The dialog box that appears under the ‘File Settings’ on the right-hand side of the box, from there you can set the file format to PNG. You need to check the ‘Transparency’ box. One thing you need to be careful about is that ‘do not check’ the ‘Smaller File (8-Bit) box. This will convert your image file into the PNG-8 file.

Here, on the left side, you will see the image size that is predicted for your PNG file. It is essential from the perspective of your website since larger files will make your web page load slowly. You must keep the web images around 200KB or a bit smaller.
Under “Image Size,” on the right-hand side of the dialog box, you can adjust the dimensions of your image. The smaller dimensions will create a small file size, and you do not require much smaller images too, as this will appear blurry or Pixelated on your webpage. Most of your consumers will be viewing your product on a retina display, so save your product image at 50% to 100% larger than the size you expect to display. The image will look crisp on mobile or desktop devices. Likewise, if you know that your product will show 400px wide that is at its maximum, so make sure to make it 600px wide.
Maintain a balance while working with maximizing your image size and minimizing your file size. If you want to save your website loading time, then save your featured products for the larger retina display and save the bulk of your product images at actual size.
Step 5: Save the Image File
After setting your images to exact proper dimensions, click on “Export All.” You must save your web-ready images in the “Save Dialog” box folder. The owner must keep the optimized file images separately from the original file images. It will remove any confusion while loading your images to the website. Set the name of your image file and set its extension to .png. Now, click on “SAVE.” After this, you can place your ‘transparent product picture’ against the different background and display it correctly.

Overview of Steps to Create Transparent Background for Logo in Photoshop
The logo of your website must also possess a transparent background. This will provide you the flexibility in displaying anywhere on your webpage. If the Logo is saved as JPG, then remove the background in Photoshop and then save the file in the form of PNG-24. Even if the Logo is in vector file with extensions like.AI, .PDF, or .EPS, then also open the file in Photoshop and convert to PNG-24 to make it website ready. The essential steps are described below:
Step 1: Open the Logo File in Photoshop
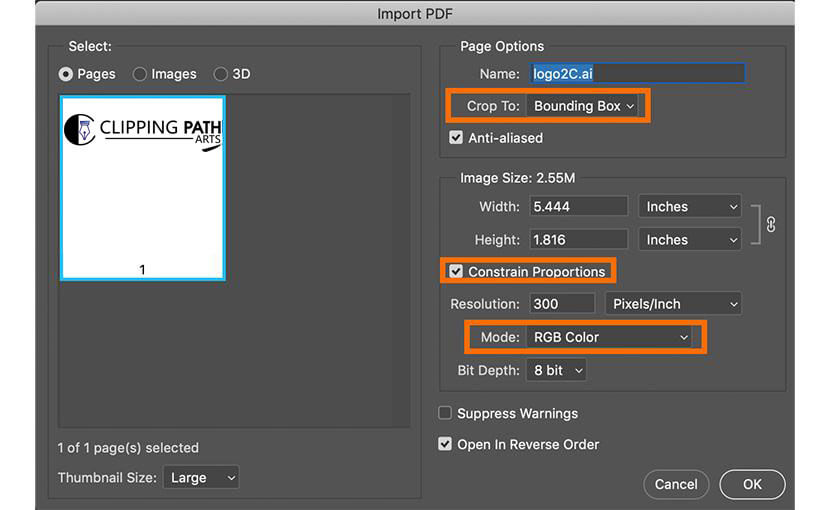
Open Photoshop, click ‘File’ then ‘Open’ and navigate for your Logo File. The .JPG or any other raster format file will open in Photoshop. If you are opening the vector file format, then correct the settings in the appeared dialog box, like
- “Crop To” that is set to the “Bounding Box”
- Check the Constrain Proportions
- Set the Mode to the RGB Color
- Click ‘OK’

Step 2: Making the Background Transparent
You can skip this step by using a Vector File. However, if you are working with the JPG file format, you need to select and then delete the background from the image. As did above, when the product image background was made transparent, so here also ‘double-click’ the Background Layer in the “Layers Panel.” Then, click OK to convert the “Background” to “Layer 0.” But, the selection of the logo file is slightly different from the product image. The reason here is it has all white background.
Choose the “Magic Wand” tool from the Toolbar, click on the white background of the “Logo File.” If you are selecting the multiple areas, then hold down the “Shift key” and click on the Magic Wand tool to add to file selection.

After selecting the whole Clipping Path logo background, type Backspace or Delete on MAC. It will now display the transparent background that is represented by the white and gray checkerboard pattern.

Step 3: Save the Logo Image as PNG File in Photoshop
You can follow Step 4 and Step 5 explained above under “making image background transparent” to export your logo file in the form of PNG-24. The steps will be the same for any file format even if your original file has an AI, PDF, JPG or any other file format. The exported file image size will be slightly lower than the file size of “transparent background product image.”
The fact is the logos have only two colors as compared to the product images. You do not have to reduce the proportions of your logo while saving this file. The dimensions will remain the same as that of the actual file, and after that, click “Save.”
Finally, these are the detailed steps if you want to create a transparent background for your image or logo file in the given formats. This will help in making the image display amazing on your website without slowing down its speed.

 Log in with Facebook


