logo
Wrong email address or username
Incorrect verification code
back to top
Search tags: winter-of-the-uae
Load new posts () and activity
Like Reblog Comment
text 2023-12-20 09:36
How to Deal With Winter Acne Breakouts

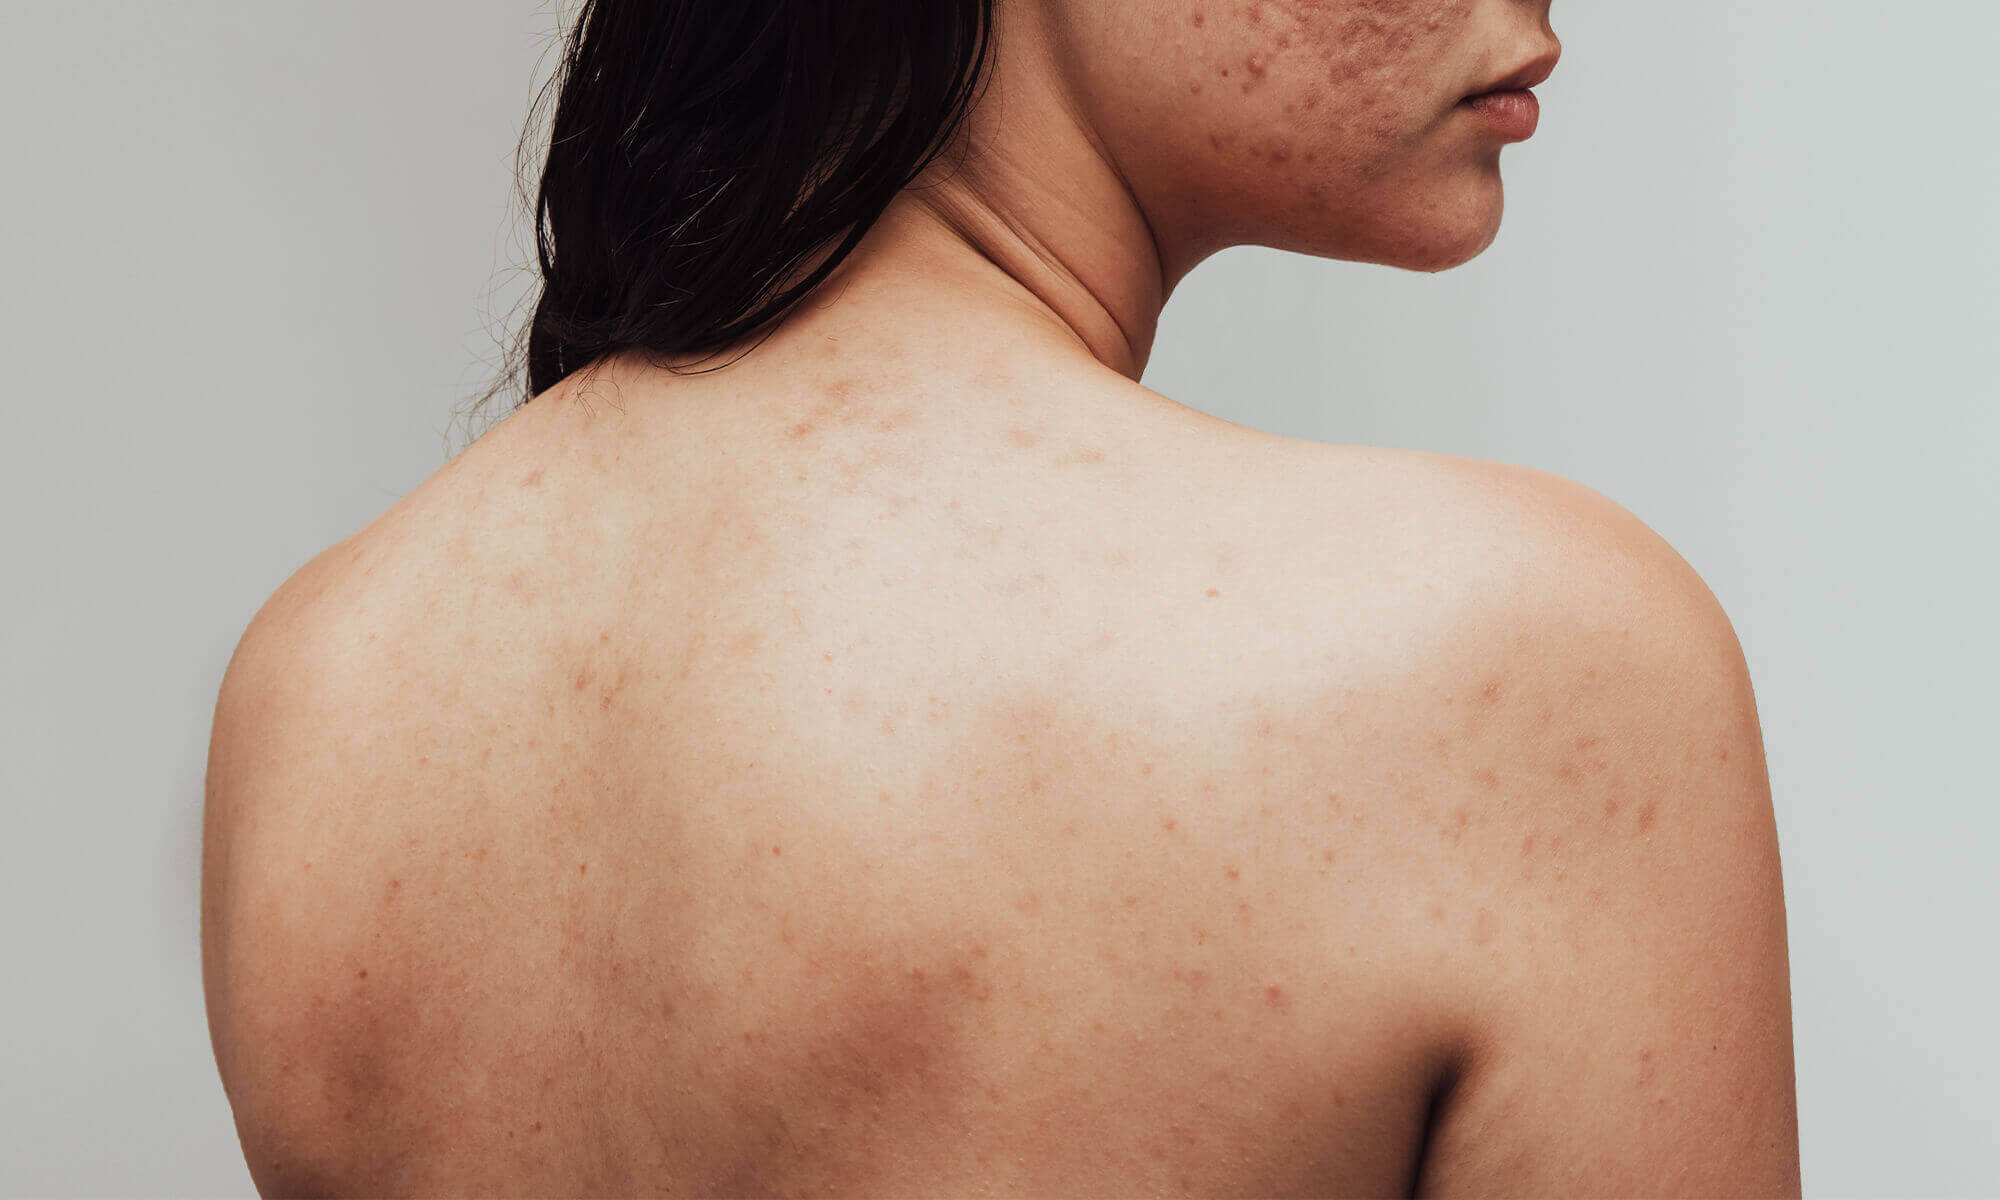
Acne is a common skin problem that almost everyone encounters at some point in their lives. When hair follicles in the skin become clogged, it usually appears on the face, back, or chest. In minor cases, blackheads or whiteheads can form on the skin; but, in more severe cases, they can manifest as pus-filled patches or cysts that can become infectious. Even when acne has resolved, these patches can leave scars on the skin.


Acne can worsen in the winter because the skin is dry and lacks nourishment. As a result, it creates more sebum, an oily fluid that lubricates the hair and skin to prevent drying. Excess sebum clogs hair follicles, resulting in the formation of spots that can get infected and create cysts.


Why is acne worse in the winter?

Because of changes in the atmosphere that lower humidity, your skin becomes drier in the winter. Outside, the cold weather creates a considerable decline in air moisture, which, when combined with the dry air of domestic heating systems, diminishes the moisture held by the skin, causing it to dry out. The harsh winter temperatures and winds outside, as well as usual winter behaviors like taking long, hot showers, dehydrate your skin even more.


To prevent further moisture loss, your dry skin produces more sebum. Extra sebum can block your pores and hair follicles and you are more likely to develop spots and acne. Dry skin is also a less efficient barrier against infection, allowing bacteria to more easily infect any patches and trapped sebum, leading the skin to grow cysts and become itchy.


How to prevent winter acne

 1. Don’t take long hot showers 

Long, hot showers dehydrate your skin. If you want to take a bath, use lukewarm water because it is gentler on your skin. If you want to take a hot shower, keep it to five minutes to avoid damaging your skin. If you don't exercise every day, you don't need to shower for a long time every day. If you're more active, limit your showers to once a day at most to avoid skin moisture loss and discomfort.


2. Moisturise regularly, particularly after showering 

Apply moisturizer immediately after washing or bathing, as moisturizing damp skin is more effective than dry skin. This is due to more moisture being trapped and rehydrated on the skin's surface. Concentrate on acne-prone areas such as your face, back, or chest, and use products that are "non-comedogenic," which means they will not clog your pores. Using a few layers of moisturizer instead of purchasing thicker lotions is generally more effective. 


You should also use a cream rather than a lotion, as the latter can contain alcohol and fragrance, which can irritate the skin. Look for creams that contain hyaluronic acid and ceramides rather than botanicals such as lavender, tea tree oil, or coconut oil.


3. Avoid make-up and skincare products that are oil-based or fragrant

Oily skincare and cosmetics are more prone to clog your pores. As previously stated, water-based non-comedogenic products are less prone to cause this. It is also critical to choose fewer aromatic skincare products. The stronger the scent of a moisturizer, the more likely it is to irritate your skin, causing it to become dry, itchy, and cracked. Wherever feasible, use fragrance-free products.


4. Cleanse your skin regularly and don’t over-exfoliate

It is critical to maintain your skin clean by washing it often, but not excessively. Reduce your usage of soaps, especially fragrant ones, as these might dry out your skin's oils. Try to use soaps containing moisturizing preparations or soap-free cleansers. While exfoliating is vital, you should only do it once or twice a week because it removes moisture and oils from your skin, making it drier and itchier.

5. Use a humidifier indoors

Consider purchasing a humidifier and placing it in the room where you sleep to battle the dry climatic conditions that occur throughout the winter. Setting the machine to 50-60% humidity should be enough to rehydrate the top layer of your epidermis and mitigate the effects of prolonged exposure to dry conditions.


How to treat winter acne

There are acne remedies that you can take orally or apply to your skin in addition to preventing winter acne by rehydrating your skin.


Treating mild winter acne 

If your acne is mild, a pharmacist should be able to advise you on how to treat it with over-the-counter benzoyl peroxide gels or creams. Quinoderm and Acnecide are two well-known brand names. These function by eliminating the blockage from the skin pores while also acting as an anti-bacterial agent. If you're using it for the first time, start with a lesser concentration (4-5%) and test it on a tiny patch of skin first, as some people find it irritates their skin. Stronger concentrations (up to 10%) are also available.


Treating severe winter acne 

If you have severe acne, you should contact your dermatologist for a prescription. Some treatments, such as Skinoren lotion, contain azelaic acid and work similarly to benzoyl peroxide. Retinoids are another type of prescription acne treatment. They can cause some redness and peeling of the skin at first, but this normally goes away with time.


Epiduo Gel, which contains benzoyl peroxide and adapalene, is another prescription-only medication. Adapalene works similarly to retinoids in that it particularly targets the skin processes that produce acne by minimizing the creation and serving of blocked pores.


Oral antibiotics, as well as those administered to the skin, are sometimes required. Direct application of Dalacin-T solution, Duac Once Daily gel, and Zineryt Topical solution is possible. If applying treatments to the skin causes too much irritation, Minocin MR capsules, Oxytetracycline tablets, and Tetralysal capsules can be taken orally.

Like Reblog Comment
review 2022-03-20 14:05
Review: Impact Winter
Impact Winter - Travis Beacham

This was amazing.  Sometimes a full-cast audiobook can turn into a hot mess, but this was very well done.  The story follows a group of survivors holed up in an old castle.  Seven years prior a comet blacked out the sun and created an endless night.  Then the vampires came.  With the ability to travel without fear of the sun, they basically take over the world.  The story was wonderfully original and kept me engaged.  The voice actors did a excellent job of bringing the story to life.  And though this was a short listen, it didn't feel rushed or have major plot holes.  I have my fingers crossed that there will be a follow-up because I am invested in this world and the characters.

Like Reblog Comment
text 2021-01-08 04:25
What Is A Roof Restoration?

May you like the Best RV Roofing System Sealant Exhaust vents Obvious fractures Unsealed edges and corners Wirings entering the roofing Antennas Around the exhaust fans and ac system The procedure is easy. All you require to do is to In this approach, you do not need to utilize a chemical eliminator, but then, it might not apply across all roofing system sealants.

You should not disrupt the RV roof to avoid a larger problem, such as harming the other portions of the roof. In addition, some owners likewise use a hair drier in getting rid of a rubber roofing system sealant, which is quite practical and easy if you're dealing with winter. On the other hand, you can likewise refer to the product manual that comes with the sealant that you purchased.

A few of them recommend utilizing a putty knife that can remove the roofing system sealant. Others can suggest using a heat gun to take it out. You can consider any of these easy methods to get rid of the set and dried sealant, especially if you require to reapply the sealant or you have actually made an error.

Explanation: best rated roofers in Tucson - DC Roofing of Arizona

It can also seal around the edges and corners so that they stay water tight. Using a sealant, you can likewise keep your Recreational Vehicle cool and dry on any weather condition. Nevertheless, you may often need to eliminate the old rubber roof covering because you require to reapply a brand-new one or correct some application mistakes.

White Elastomeric Roof Coating - Understand The Basics

With it, you can use a brand-new one to continue enjoying its benefits, such as avoiding water damage, conserving cash and preventing substantial repair work. All these can also extend your Recreational Vehicle's life-span and promote the convenience of everyone aboard your vehicle.

Tips For Specifying And Applying Elastomeric CoatingsCool King – 7-year White Reflective Elastomeric Roof Coating

( This post may include affiliate links. For more details check out our Personal privacy page.) My RV roof that requires to be changed! Welcome to my RV Restoration Series!.?.!! So you want a RV but can't afford one. If you're like me and have more time than cash, then maybe your finest option is to purchase an old Recreational Vehicle and repair it up.

All old RV's do! Time to consider an! I know, a Recreational Vehicle roofing system replacement can look like an impossibly uphill struggle. I get it. I bought my RV over a year ago and didn't have the guts to start tackling this task up until today. But I'm here to inform you, if I can do it, you can do it.

It has only 55,000 miles and all the devices work and I like the layout. The catch? Water damage! I have actually never worked on a RV before and I need to confess, I'm terrified. I have actually done a great deal of home remodeling and I'm still frightened. That's since this is all new to me and I have no idea what to expect.

How To Apply Elastomeric Roof Coating

Pros And Cons Of Elastomeric CoatingsElastomeric Commercial Roof Coatings: Types, Applications

So my initial step (that I really did numerous months earlier when I purchased the camper) was making a shelter so I could work without rain gathering. I purchased a 12 x 26 SuperMax Canopy by ShelterLogic (over $450 on Amazon however I purchased mine from Northern Tool for about $340!) and boosted the legs with wood extensions to make the canopy high enough that I might stand on the roof and walk underneath it.

It looks like there are no canopies available that are high adequate to function as a Recreational Vehicle carport. You might buy a real metal roof RV carport however those are way more costly, generally $2000 and up! Likewise these don't usually have enough clearance above for you to work on the roofing system.

I determined the expense of doing it that method (wood framing) and it came out to a comparable rate as buying this canopy. I figured I would rather have it semi-portable so I opted for the canopy, plus this enables me to adjust the height up and down when I require to.

Eventually those bent throughout a wind storm. Then I sawed 1 1/4 square legs from 24's to put inside the canopy legs (once again holding the canopy up with pipeline clamps.) and strengthening the 4 corners with an extra 24 screwed to it. This is still a little floppy. I most likely should have handed over for some stiff steel pipeline from the start.

How To Apply Elastomeric Cool Roof Coatings: 3 Easy Steps

Simply make certain to stake the corners down with rope if you have any wind! I raised a 12 x 26 canopy to cover my workspace. Time to go up and have a look at some of the issue areas on my old EPDM roof. EPDM is the most typical type of rubber roof found on campers.

Fractures in the EPDM roofing at edge of camper. An old patch task on the Recreational Vehicle rubber roof. Loads of caulk piled over old issue locations. As you can see, this roofing system has had a great deal of issues for many years. Looking from the within the camper there have actually plainly been leakages in lots of locations of the roofing.

I grabbed an energy knife and started slicing. The first thing I saw is that there were 2 layers. On the bottom is the initial EPDM rubber roofing layer. I understand it's EPDM rubber and not TPO rubber since of the black support. (TPO roof is white on both sides.) On top of my EPDM roofing system is a thin Recreational Vehicle roofing system covering that was applied later.

I just left the roofing finish stuck to the EPDM roof and pulled them up together. (You do not require to peel them up separately.) Beginning to peel off roofing how much does it cost to reseal a roof system finishing. Peeling up area of the bottom layer of rubber. This shows that the original Recreational Vehicle roof was EPDM because of the black backing.

Elastomeric Roof - Premium Acrylic Coatings

Elastomeric Roof Coating & Waterproofing ProtectionRoof Coating Contractor For Elastomeric Roof

https://www.youtube.com/embed/-q_LG0t9jFQ

I cut lines with an utility knife around components. All rubber roof eliminated from camper. This step went pretty rapidly. There was an adhesive under the bottom layer of rubber that was still quite well stuck in numerous places, however with an excellent bit of force it peeled up cleanly.

Like Reblog Comment
text 2021-01-08 01:35
Kool Seal Premium 10 Year Elastomeric Roof Coating

A polyester material is used because it will extend with the finishes. (Fiberglas material is not recommended.) Fabric is generally cut to extend 3 inches beyond the fixed area in all instructions. The covering is used to the roofing system surface area and the fabric is right away pressed into the wet surface.

Roof Coating SpecialistsFlat Roof Coatings

If your roofing has stucco parapets, examine them for cracks along the sides and top. These areas typically allow water to get in the wall and can cause blisters and wrinkles in the roof surface area. Repair work with Elastek 103 Crack & Joint Sealant. If you do not have parapets, analyze the metal drip edge for a tight seal with the roofing system membrane.

Adhesion Is Important When Applying An Elastomeric RoofWhich Roof Coating Performs Best?

Roof Coating SpecialistsExpancel For Elastomeric Cool Roof Coatings

Apply covering when the roofing system is dry and the sealant has actually set. You will be utilizing a 9-inch sturdy frame, -inch paint roller for spreading out coating on roofing system or 1-1/4-inch roller for dipping in pail, and a 5to-6-foot extension pole. Utilize a 3/4-inch roller with basecoats and emulsions. Draw up your roofing and make each pail fill that location.

See Page:

An inexpensive 3-inch or 4-inch brush must be utilized to reach areas not possible with a roller. Use a stiff paintbrush for applying 103 Fracture & Joint Sealant. Topcoat must constantly be used in a very thick coat, to achieve a rate of 100 sq. ft. per gallon, and a dry finish thickness of 10 mils.

Coatings are applied with a minimum of working the product for a maximum density. Work right from the pail, dipping the roller or pour on roof and spread. Give scupper and ponding areas several extra coats for added security. Allow each coat to dry before recoating. In cool weather condition, one coat a day is the maximum; two might be possible in the summer.

The Ultimate Guide To Rv Roof Coating

ft. per gallon, or a minimum of 20 mils dry covering. If 2 total topcoats are not used, constantly use two thick coats to issue areas such as scuppers, drain locations, ponding locations, seams, and repaired locations. Prevent using Elastek Solar Magic or The Shield on ponding roofs. Clean skin and tools immediately with water.

These are the wires connecting the roof venting fan. I clipped them just above the blue splice joints. Roof vent removed and tidied up. After clipping the wire and getting rid of the vent, I cleaned up any staying goop and got my very first excellent look at the roofing frame. It's metal! 1 1/2 inches thick.

Some RV roofs are framed with wood, others have metal framing. I had no idea what remained in my camper until this point. Not too happy about the amount of rust on it, however hopefully it is still structurally sound! I removed some rust and made a big mess inside the restroom.

Oops. Possibly I need to have put a tarpaulin down first. My final goal of the day was to get the refrigerator vent cover off. I observed RV sealant blobs at 4 points on the cover so assumed there must be screws under them. I pried them up and discovered Phillips screw heads.

Exposing the screws in the refrigerator vent cap. Peeling old Recreational Vehicle roofing finish on top of fridge vent cap I likewise saw that there was a coat of Recreational Vehicle roof covering over the vent cap. These coatings are painted on with a brush so plainly whoever did this finishing just blobbed in on top of whatever.

Visit This Site Right Here: https://www.dcroofingarizona.com/residential/roof-coating-tucson/elastomeric-roof-coatings/

Taking off the cover of the fridge roof vent. As soon as the cap is off it's more of the same. Removing more rubber and scraping off RV roofing sealant and old caulk. Get comfortable due to the fact that this sucker has 32 screws in it! Ugh. Scraping lap sealant and caulk from screw heads.

Pros And Cons Of Elastomeric Coatings

Some screws will be too rusted and need pliers to remove. Prying off the refrigerator roofing vent after all screws are eliminated. (and the tools used.) Almost every screw remained in excellent adequate condition to remove with a socket motorist, but a couple were too rusty and needed to be twisted out with vice grip pliers.

I peeled the remaining rubber roof from under the flange and then scraped off the old putty underneath. I'll clean it much better if and when I decide to reuse it. Appears like it's in decent shape so I most likely will. Removing the old putty from the flange of the fridge roof vent.

Flat Roof CoatingsEverything You Need To Know About Roof Coatings

I scraped the framing inside the opening and found that the framing around the refrigerator vent is made from wood (unlike the metal frame around the roof vent.) Then I covered it up with a scrap of wood so I wouldn't drop any scrap into the fins on the back of the fridge! Here's a peek inside the fridge vent.

White-seal 100% Acrylic Elastomeric Reflective RoofPro-q 7-year White Elastomeric Roof Coating

That's as far as I got on day 1 after about 5 hours of lazy work. Not a bad start. I likewise discovered this awesome slime mold growing in the mulch under the camper. If you've never ever seen a slime mold, have a look at some time lapses of them growing! They are freaking amazing! A slime mold under the camper! Now continue to step 2 when I eliminate the remainder of the roofing fixtures!.

https://www.youtube.com/embed/OaRY8BwfjMc

?.!!.

Like Reblog Comment
url 2021-01-04 09:29
Major Snow Storm Could Wallop NYC and Northeast Regions

Meteorology experts forecast a major winter storm that is expected to bring in the season’s first heavy snowfall in certain parts of the country.

More posts
Your Dashboard view:
Need help?