If you still have any doubts how to +Shelf your books on BookLikes the following guest post should dispel all your doubts. Worry not, read on and keep on shelving! You can also get back to the previous bookshelf posts anytime:
*
A guest post by Jenn from Murder by Death
BookLikes has asked if I would talk about the Advanced Shelving Options window, and how to get the most use out of it. Most things on BookLikes can be accessed via at least 2 different paths and the Advanced Shelving window is no different.
The first, less obvious way, but very useful if you use your shelves as your command center, is through the list view of your bookshelves. If you’re unfamiliar with the list view, or on how to set which columns you see, check out this quick tutorial. It’s not step-by-step, but it should get you where you need to be.
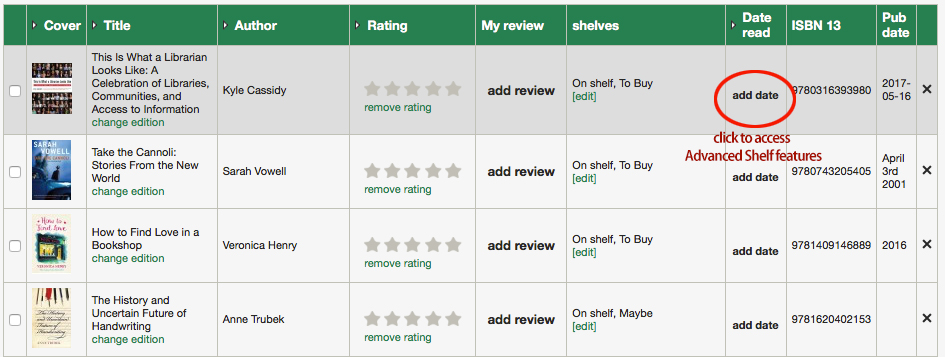
To access the Advanced Shelf Options from the list view of your bookshelves, you need to make the ‘date read’ column visible; once you see it, you can click on 'add date':
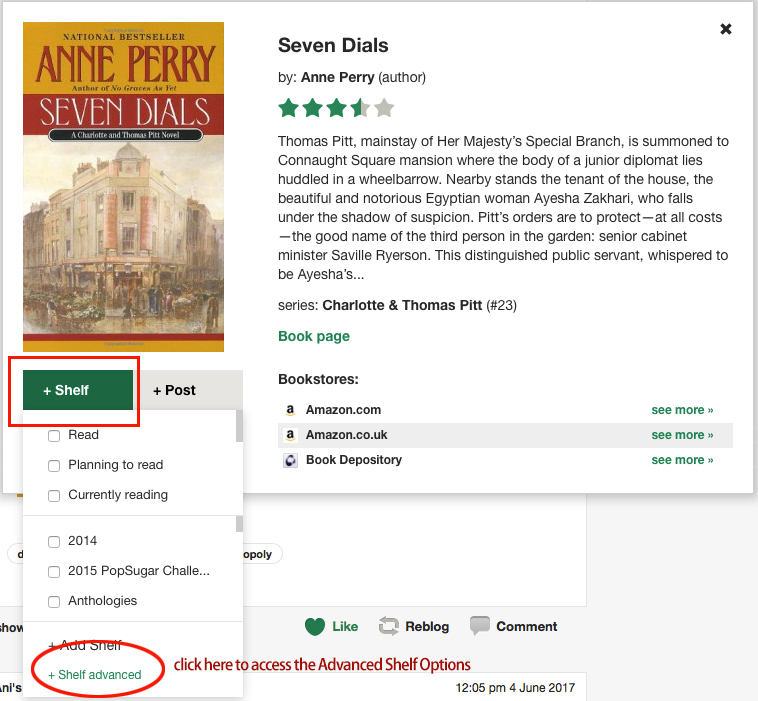
The second way to access the Advanced shelf features is the most accessible, as you can reach it from every book cover on BookLikes, no matter where you’re at on the site: if you see a book you want to put on your shelves, click the book cover and when the book’s popup window comes up, use the +Shelf button (if you’re on a book page, the +Shelf button is already there, just under the book cover image).
Off topic, but important to note: If your green button says something different, that means you’ve already shelved the book:
Read: You’ve already marked this book as Read.
Currently Reading: Um, yeah, I’m sure you know you’re already reading the book.
Planning to Read: At some point you’ve marked your interest in reading this book (along with about 1,000 others if you’re like most of us).
On Shelf: This is the one most likely to cause confusion. If you’ve put the book on one of your custom exclusive shelves, but not marked it as Read, Currently Reading, or Planning to Read, the button will just say On Shelf.
This can also happen if you’ve removed the book from all your shelves but not actually deleted it from your shelves. This is easy to check from here: click on the button (On Shelf) and scroll down your list of shelves; if there aren’t any checkmarks, you have a floating book with no sense of shelf, wafting about in the ether. If you want to keep it, choose a shelf for it to live on; if you want to exorcise it from your shelves for good, give it a home anyway, then go to your shelves and use ‘delete book’, or the ‘X’ at the far right end of your shelves in list view.
Whichever path you choose, you’ll get the Advanced Shelves popup window. Here’s the bare basic version of this window, for a book that has no status and no shelves:

We’ll get into each feature in detail, but as you can see there are options to mark a book Read, Currently Reading, or Planning to Read, a link to add it to shelves, and/or exclusive statuses, followed by the option to express your feelings, mark the book for your wishlist, as a favourite and/or private, and add a private note. But there’s a lot more that you can do from this window, depending on the book’s status.
If you’ve already marked a book Planning to Read, what you see in the Advanced Reading window isn’t any different to the above, except that the 'Planning to Read' button is green. So, we’ll start with the Currently Reading Advanced Shelf:

Take a moment to check out the differences. I’ve labeled some of them, but from top to bottom, left to right, here’s a detailed list of what you can do from here:
If you click on the cover thumbnail, you’ll be taken to the book’s page on BookLikes. Clicking this link will load the book page in a new tab, so you won’t lose any changes you might have made. The popup window will remain open in it’s browser tab, waiting for you to come back.
If you click on the Title of the book, you’ll be taken to the book’s page on BookLikes. BUT clicking on the title will load the book page in your current tab, so if you’ve made changes in the Advanced shelf options already, DON’T CLICK THE TITLE - you’ll lose your changes and have to start again.
Clicking on the Author’s name will take you to the author’s BookLikes page. This link will also load in the current tab, so the same warning applies here - don’t click this link if you’ve made changes in the advanced options window unless you like doing things twice. ;-)
The Book page link is another link to the BookLikes book page and it, like the cover, loads in a new tab so it’s safe to click this link if you need to check something and come back.
You can change the book’s Big Three statuses on the next line: clicking any of the Read, Currently Reading, or Planning to Read tabs will change the book’s status, and that button will turn green. Depending on which tab you select, the options directly underneath the tabs may change.
Note: If you’ve read the book once but want to read it again, you can change the status to either Currently Reading, or Planning to Read without losing your read dates (assuming you’ve recorded dates).
If the book is marked as Currently Reading, as above, you’ll see a place to enter the date you started reading and, optionally, a place you can enter how many pages you’ve read so far. Notice it says: “I’ve read/listened to: ___ out of ___," with a pull-down menu right after. This is a built-in over-ride; if your shelved book’s page numbers don’t accurately match the book you have in hand, you can adjust it here. The text field takes pages or minutes (for audiobooks). The drop down menu allows you to choose pages, percentage (for ebooks), or minutes and is used in the Currently Reading widgets on your blog and dashboard. This allows you to make sure your progress is tracked as accurately as possible (although BL can’t do anything about all the filler at the end of some ebooks).
The next section is for shelving - you can see in the graphic above that I’ve already shelved this book on two shelves: Books about Books and History. If I want to change the shelves the book is on, or add it to more shelves, I can click on ‘Edit Shelves’ (or ‘Edit Exclusive Shelves’ - they both open the same view) and see this:
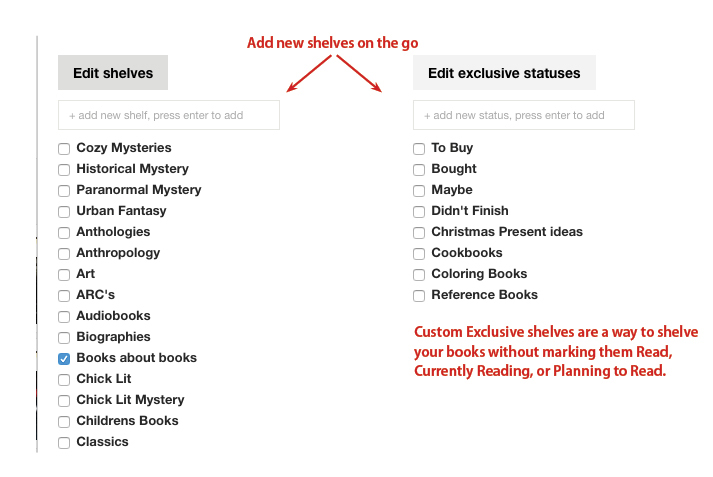
(Yours, of course, will list your shelves, not mine.)
Notice the two fields at the top of each list - you can add new shelves here by entering the new shelf name, and clicking ‘enter’ or ‘return’.
What is an exclusive shelf? The easiest way to describe an exclusive shelf, I think, is this: An exclusive shelf, or shelves, are for the books you never intend to read. For example:
• dictionaries or encyclopaedias
• cookbooks
• gift ideas for other people
These are the type of books you might want to track using shelves, but not track using the Read, Currently Reading or Planning to Read statuses. Creating exclusive shelves allows you to do that.
The next line of options includes some possibly overlooked features that let you add an additional level of organisation, and a little personality, to your shelving. You can share your feelings about the book using the dropdown menu to choose an emoticon that comes closest to your thoughts (alas, there is no ‘meh’ emoticon). And then, to the right of this menu, are three checkbox options:
Wishlist - This creates a very exclusive shelf that you can use to keep track of those books you’d like to someday own or borrow. I say ‘very’ because it’s one of the shelves you cannot edit, like the Big 3 statuses. Use it as a shopping list for yourself, or list those gorgeous but pricey books and share the list with someone looking for gift ideas. ;-)
Favorite - Another very exclusive shelf, this one creates a list of those books you adore; maybe they’re part of your personal literary canon, or the books you’d take in the mythical deserted island scenario, or maybe they’re the books you think everyone should read at least once.
Private - The ultimate very exclusive shelf, this checkbox allows you to shelve books secretly and invisibly, useful if you’ve discovered your mom is following you or found your blog online, and you’d really rather her not know about the racy stuff you read. If you have books you’d just rather keep to yourself, mark them as ‘private’ and nobody can see them on your shelves except you (and whoever else has access to your BL account password).
Note about Private status: It marks the book private so it cannot be seen by anyone else from your shelves; if you create a post about a private book, or write a review of it, that’s going to be visible to all. Posts cannot be marked private (and by extension, neither can reviews).
Speaking of privacy and your books, the next bit is the part where you keep private book notes. If you click on 'Add Private Note' you’ll see:

… and you can write any notes to yourself about the book (or feeding the cats). These notes are ALWAYS private; they are not visible to anyone but yourself.
Last but most importantly are the Save buttons. When you’ve finished making changes to your shelving, you have three options: You can decide to click ‘Cancel’, which undoes the changes you’ve made since you’ve opened this Advanced Options window. You can click ‘Save’ which saves your changes and takes you back to whatever page you were on when you accessed the Advanced Options, or you can click ‘Save and write a review’, which saves your changes and immediately opens the 'Create Post' page.
Note that this does not work quite the same way as the ‘Update’ function does on your dashboard: it will not automatically populate the title bar with “Reading Progress: I’ve read x of x pages”.
And that’s everything you can do with the Advanced Shelf Options… or is it? I honestly can’t believe how long this post is, but if you’ve made it this far, wait! there’s more!
If you use the Advance Shelf window to mark a book as 'Read' there will be even more options. Mark a book as Read, and your window will look like this:

(The screenshot is cut off at the bottom because it ran off my screen.)
We’ll just cover the new stuff: Once a book is read, you can rate it from the Advance Shelf window; hover over the stars to select anything from 1/2 to 5 stars. When you see the rating you want, just click your mouse or trackpad to save it. If you accidentally clicked before you meant to, or changed your mind, click ‘remove rating’ to clear the stars and start again.
Note: Rating your book from this window and then clicking ‘Save and write a review’ will copy your rating over to the Create New Post page, and automatically mark your post as a review.
The next section is mostly self explanatory - you can set your reading dates. Start date and begin date, and both are optional, but note that you must have a finished date set for the book to be recorded in your yearly reading stats and reading challenge (if you’re participating).
If you re-read, and many of us do, and you’d like to record those re-read dates, just click ‘add new date’ to get another set of date selectors. If you’ve hit ‘add a new date’ by accident, clicking ‘remove dates’ makes them go away.
I think that’s everything. If you’re taking advantage of BookLikes powerful shelving features, the Advance Shelf window really is command central in so many ways. Hopefully if you’ve made it all the way to the end of this post, you’ve picked up a handy hint or three that will make using BookLikes easier and more enjoyable. If I’ve managed to confuse you, please do not hesitate to tell me so –or ask any questions– in the comments below and I or the BookLikes team will endeavor to clarify.
Happy BookLiking!
*
Thank you Jenn! <3


 Log in with Facebook


