logo
Wrong email address or username
Incorrect verification code
back to top
Search tags: shelf-sort-order
Load new posts () and activity
Like Reblog Comment
show activity (+)
text 2020-01-02 22:01
Work-Around for "Date Read" / "End Reading" Setting

As Moonlight Reader and Darth Pony Pedant noted, there's a bug in the system that currently doesn't let you record any reading end dates beyond 2019 (i.e., from Jan. 1, 2020 onwards).  This is systemic, i.e. will have to be fixed by BookLikes or their outsourced helpers, HOWEVER, for the time being here's an easy workaround:


Open your bookshelf in admin view.  Among the icons next to the 25-50-75 drop-down menu for selecting the number of books displayed on your shelf, there is a little nut (or wheel)-shaped icon that takes you to the special "settings" menu for your shelf page.  Click on it.


You shelf settings menu contains a category called "Shelf table view - visible columns."  Among the selections offered there, find the option for "private note".  Check it off -- but leave all your previously checked selections alone!  I.e., just add this selection to all the others ... unless of course you really want to modify those, too, while you're at it.  Don't forget to save your settings.


Now, if you return to your bookshelf, it should contain a new column called "Note". 


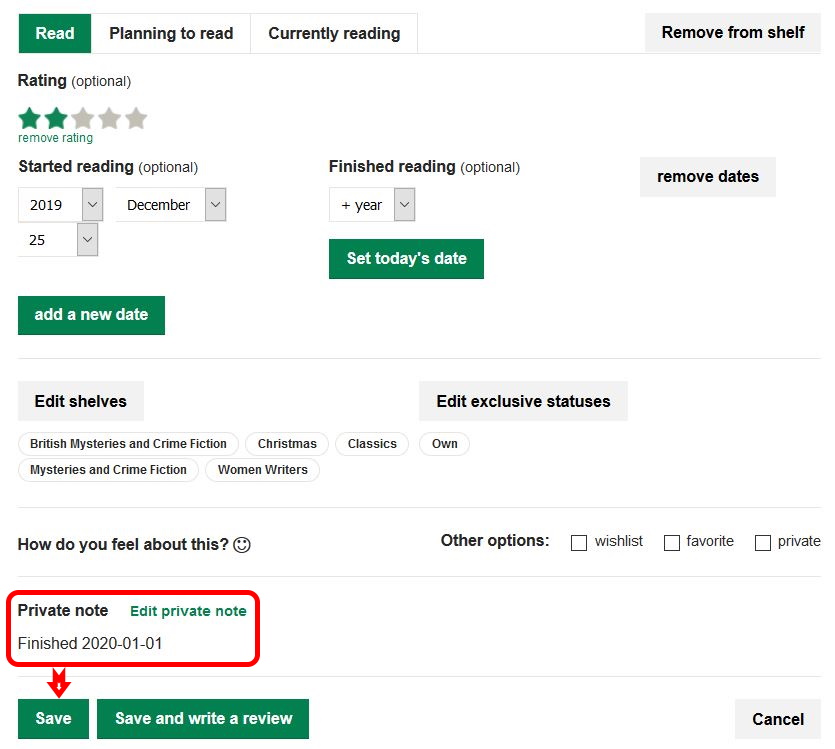
Find the book(s) for which you want to record your reading end date.  Open the popup screen where you'd ordinarily do so.  At the bottom of that screen, there is a "private note" option.  Click on it and record your "finished" date there.  Save and close the menu.  Your note should now show up in the shelf table column that you just created.  Ehh voilà -- you're done!


-----------------------------------------------------


↓↓↓ detail ↓↓↓


Please note: This is only a workaround to record your reading end date as such -- it's no replacement for a proper fix, and it will not work with your 2020 reading challenge nor with sorting books by read date.  But it's easy to implement, and at least allows you to keep your records straight as far as dates go.


Addenda:

1.: I found out this morning that the system doesn't report reading start dates, either.  So you'll have to include both the start and the end date in your notes.

2.: Elentarri has found that the system does still record review submission dates.  So another way to record your reading end date would be to create a mini-post (even if it only says "I liked / didn't like this" or "I finished this on ..."), tick the "review" check box, and manually reset the posting date to the date you actually finished the book.

3. To facilitate sorting / finding your 2020 books on your shelves, it may make sense to create a "2020" shelf (if you're not shelving by year already anyway).

Like Reblog Comment
show activity (+)
text 2013-10-01 21:03
Customizing Shelf Sort Order

By default, visitors to your Shelf page will initially see your books sorted by the date they were added, with the most recently added books first.  Want to change the initial sort order for your shelf page, for instance to show your most recently read books first?  Here's how:


1. Navigate to your template customization page (Settings -> Blog -> Customize).


2. Edit the template html for your Blog page, and add the following to the end of the <head> element, right above the </head> tag:


<meta name="select:defaultShelfSortBy:Shelf Sort By" content="Date Read:dater|Date Added:date|Author:author|Title:title|Rating:rating" />

<meta name="select:defaultShelfSortOrder:Shelf Sort Order" content="Descending:desc|Ascending:asc" />


3. Save your changes.


4. Return to the template customization page, and scroll to the bottom of the settings pane.  You should see two new settings, 'Shelf Sort By' and 'Shelf Sort Order'.  Choose the sort order options your prefer, for instance 'Date Read' and 'Descending' and save the settings.


5. Edit the template html for your Blog page, locate the following:


{% if blog.isSiteShelf %}
<h3 class="menu-entry">
<a class="set-bradius3" href="{{ navigation.shelf }}">{{ "Shelf"|l }}</a>
</h3>
{% endif %}

and edit it to read:


{% if blog.isSiteShelf %}
<h3 class="menu-entry">
<a class="set-bradius3" href="{{ navigation.shelf }}?by={{ customize.defaultShelfSortBy }}&order={{ customize.defaultShelfSortOrder }}">{{ "Shelf"|l }}</a>
</h3>
{% endif %}

6. Save your changes.


7. Repeat steps 5 and 6 for your Timeline, Followings/Followers and Page pages.


8. Edit the template html for your Shelf page, locate the following:


{% if blog.isSiteShelf %}
<h3 class="menu-entry">
<a class="set-bradius3 menu-active" href="{{ navigation.shelf }}">{{ "Shelf"|l }}</a>
</h3>
{% endif %}

and edit it to read:


{% if blog.isSiteShelf %}
<h3 class="menu-entry">
<a class="set-bradius3 menu-active" href="{{ navigation.shelf }}?by={{ customize.defaultShelfSortBy }}&order={{ customize.defaultShelfSortOrder }}">{{ "Shelf"|l }}</a>
</h3>
{% endif %}

9. Save your changes.


And you're done!  Visitors to your shelf page will see your books initially sorted in the order you've chosen.  If you want to change the order, you can now do so via the 'Shelf Sort By' and 'Shelf Sort Order' settings on your template customization page.


More posts
Your Dashboard view:
Need help?